
Clear furniture assembly instructions matter because they turn a box of parts into a stable piece you can actually live with. I treat assembly as a sequence, not a scavenger hunt: verify parts, read the diagrams, build in the right order, then lock everything down only after the frame is square. In this article I’ll walk through the process I use, the mistakes that waste time, and the safety checks that matter once the piece is in the room.
The safest and fastest assembly starts before the first screw goes in
- Sort every panel and fastener before you assemble anything.
- Keep joints loose until the whole frame lines up.
- Use the right hand tools first; power tools can strip soft hardware fast.
- Plan on a second person for tall, heavy, or awkward pieces.
- Anchor dressers, bookcases, and other climbable furniture to the wall.
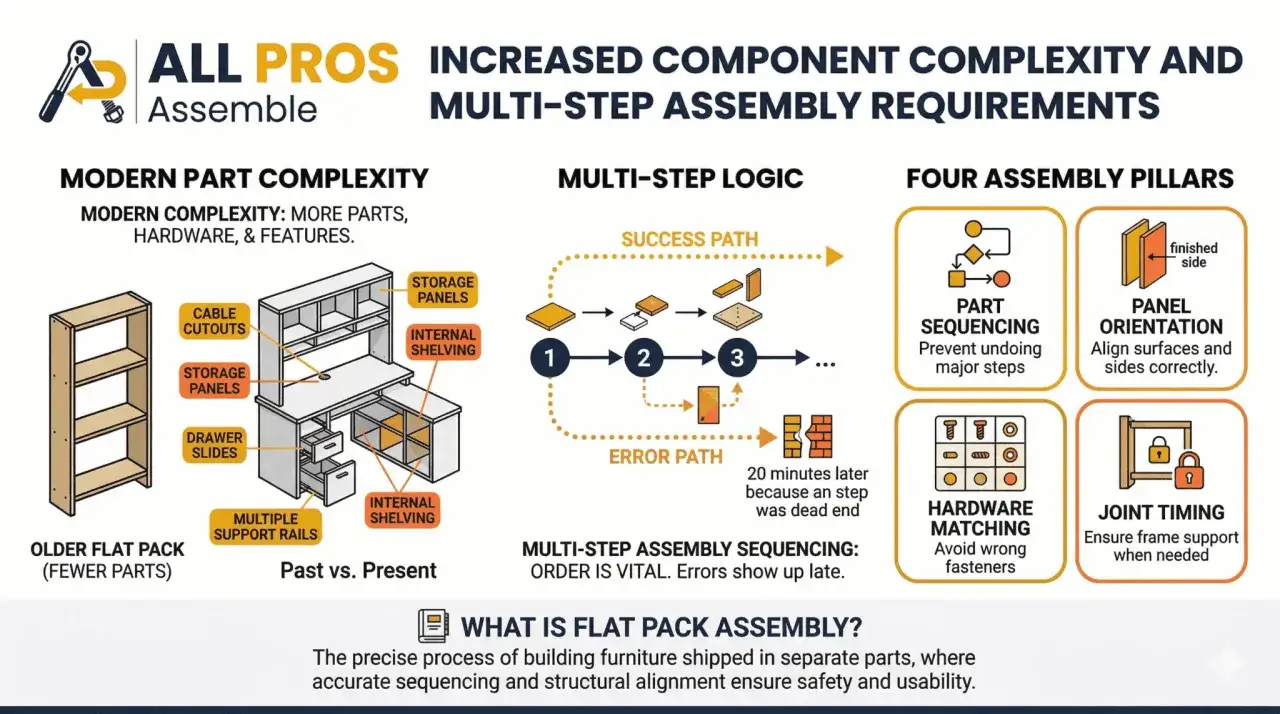
What the manual is really telling you
Most manuals are more useful than they look. The drawings usually tell you three things at once: which part goes where, which side faces out, and which fastener is meant for that connection. I like to skim the whole booklet once before touching the hardware because the hidden details are usually the expensive ones, like a mirrored panel, a left-hand drawer slide, or a step that must stay loose until the end.
| What I check first | Why it matters | My rule |
|---|---|---|
| Part numbers and labels | Prevents reversed panels and missing pieces from showing up halfway through | Lay out every part before assembly starts |
| Two-person icons | Signals lifting, turning, or alignment that is unsafe solo | Do not “wing it” if the manual shows two people |
| Hardware symbols | Confirms whether a screw, cam lock, dowel, or washer belongs in that step | Match shape first, size second |
| Finish warnings | Protects veneer, painted surfaces, and glass from scratches | Use a blanket or cardboard under the panels |
IKEA’s current product pages are a good example of why I prefer having the PDF handy on a phone or laptop: the exact file is tied to the item, which cuts down on guesswork. Once the manual makes sense, the rest of the build becomes a sequence you can control instead of a pile of assumptions. That sequence is what I focus on next.
The assembly sequence that saves the most time
For most flat-pack furniture, I use the same order every time. It is simple, but it prevents the two failures I see most often: building a crooked frame and tightening parts too early.
- Unpack and inventory everything. Compare the parts, hardware, and tools against the list before you assemble anything.
- Separate the hardware. Put screws, cam bolts, dowels, and washers into small groups so similar pieces do not get mixed together.
- Build on a protected surface. A blanket, rug pad, or corrugated cardboard protects edges and keeps panels from sliding.
- Start every connection loosely. I finger-tighten first, then use the tool only after the frame is aligned.
- Check squareness before final tightening. If the frame is racked, doors and drawers will never sit right later.
- Add moving parts last. Install drawer slides, doors, shelves, and feet after the main box is stable.
- Test before loading. Open doors, pull drawers, and press lightly on the structure before you put anything heavy inside.
For planning, I usually think in ranges rather than promises: a side table may take 20 to 40 minutes, a bookshelf 45 to 90 minutes, and a wardrobe or bed frame can easily take 2 to 4 hours, especially if there are drawers or doors. That is why the next section matters so much: small mistakes do not just slow you down, they compound.
The mistakes that cause wobble, scratches, and do-overs
The biggest time sink is not a complicated part. It is a preventable mistake made too early. I see the same ones over and over, and they are all avoidable once you know what to watch for.
- Using a power drill on delicate hardware. Many cam locks and soft fasteners strip quickly, so hand tools are safer for final tightening.
- Overtightening before the frame is square. A joint that is locked down too soon can twist the whole piece out of alignment.
- Mixing similar screws. One slightly longer screw can punch through a panel or split an edge.
- Ignoring handed parts. Left and right rails, doors, and legs are easy to swap if you rush the diagrams.
- Assembling directly on hardwood or tile. Even one drag across the floor can mark the finish before the furniture is ever used.
- Skipping the level check. If the floor is uneven, the piece may look fine empty and still wobble under load.
That advice sounds basic, but it is the difference between a clean build and a second trip to the hardware store. When the piece gets large enough, though, the better move is often to stop doing everything alone.
When a second person or a pro is the smarter choice
Some furniture is technically possible to assemble solo and still not worth the trouble. If the manual shows two people, I treat that as a real requirement, not a suggestion. Tall bookcases, wardrobes, glass doors, bed frames with slats, and any item that needs to be rotated upright mid-build are all easier and safer with help.
| Situation | Why help matters | My recommendation |
|---|---|---|
| Tall or top-heavy furniture | One person cannot steady it while the other aligns holes and fasteners | Use two people from the start |
| Glass or mirrored components | Fragile parts fail fast if they flex or twist | Keep a second set of hands on it |
| Wall-mounted or anchored pieces | Alignment with studs and brackets is easier with someone holding position | Get help before drilling |
| Time-sensitive assembly | Rushing increases mistakes and missing parts | Consider professional assembly |
That last option is not a luxury move. For a large section, paying for assembly can be cheaper than replacing a damaged panel or living with a crooked drawer front. I also think it is the right call when the room is tight, the hardware is unfamiliar, or the furniture has to be ready for use the same day. Once the piece is built, the job is not quite finished yet, because stability still matters.
Why anchoring and stability matter after the build
For dressers, bookcases, and other climbable furniture, wall anchoring is not optional in my book. The CPSC’s Anchor It! campaign treats unsecured furniture as a serious tip-over hazard, especially in homes with children, and that warning lines up with what I see in real rooms: even a well-built piece can be unsafe if it is tall, narrow, and unanchored.
I work from the same logic the safety guides use. Make sure the furniture is assembled exactly as directed, move it away from the wall, remove drawers if that makes access easier, and identify the wall type before drilling. A stud wall is different from solid masonry, and if you are unsure what is behind the drywall, stop and scan first. The exact hardware depends on the wall system and the kit in the box, which is another reason I never improvise this step.
- Use the bracket or anti-tip kit that came with the furniture whenever possible.
- Anchor into a stud when you can.
- If the wall is masonry or another solid surface, use the hardware meant for that surface.
- Tug the straps or brackets after installation to confirm the connection feels firm.
- Keep heavy items in lower drawers and shelves.
Anchoring is the point where assembly turns into everyday safety. If the piece will hold books, dishes, electronics, or anything a child can climb, I would rather spend the extra 15 minutes now than regret the shortcut later. The final step is making sure the furniture stays solid after the room settles back into use.
The small habits that keep the piece solid long after the box is gone
The best-built furniture still benefits from a little maintenance. I keep the leftover hardware in a labeled envelope, save the PDF manual, and check the joints again after a week or two because new furniture can settle slightly once it starts carrying weight. If drawers start rubbing or a door drifts out of alignment, I do not assume the piece is defective; I check level feet, hinge screws, and any connection that may have relaxed.
I also avoid moving assembled furniture by the top rail or the door frame. Lift from the base whenever possible, and if the piece has to be relocated, empty drawers and shelves first. Those small habits protect the finish, reduce wobble, and make the next move less annoying than the first one. That is the real value of furniture assembly instructions: fewer surprises, fewer stripped screws, and a finished piece that feels secure the first time you use it.