Douglas fir can look refined, warm, and architectural, but the finish only works if the color is handled with restraint. When staining Douglas fir, the main challenge is not whether the wood accepts color; it is how evenly the earlywood and latewood take it, especially on wide boards, trim, and doors. I’m going to show you how to prep it, choose the right stain type, avoid blotching, and decide when a clear topcoat or an exterior system makes more sense.
What matters most before you start
- Douglas fir has strong grain contrast, so uneven absorption is the main risk.
- A test board and the right sanding sequence matter more than the label on the can.
- Pre-stain conditioner helps, but it does not rescue poor prep or a bad board.
- Gel stain is often the most forgiving option on vertical or blotchy pieces.
- Interior projects need a clear protective topcoat; exterior projects need an exterior-rated system.
- End grain and knots usually need special attention because they darken faster.
Why Douglas fir can look beautiful or blotchy
Douglas fir has a bold, high-contrast grain, which is exactly why it can look so good in a finished room. It also means the wood does not absorb stain in one uniform way. The softer earlywood drinks color quickly, while the denser latewood stays lighter, and that split personality is what creates the striped or patchy look people complain about.
I think of fir as a wood that rewards control. If you want a clean, architectural result, you need to respect the grain instead of trying to overpower it with a dark stain. A lighter, transparent color can look elegant; a heavy, muddy stain usually just flattens the character without actually making the board look more expensive. That is why prep and product choice matter more here than they do on many other species.
That unevenness is exactly why the next step is less about color and more about surface prep.
Prep the surface so the color lands evenly
Most stain problems on Douglas fir start long before the can is opened. I begin by sanding in stages, usually stopping between 150 and 180 grit for most furniture or trim projects. If I’m using a pre-stain conditioner, Minwax recommends 220 grit on bare wood first, then applying the conditioner and staining within 2 hours. That timing matters because the pores start to close again once the conditioner dries out.
I also pay special attention to end grain. It acts like a straw and usually goes much darker than the face grain. On doors, table edges, and trim returns, I either seal the end grain lightly or make sure my test board includes the same kind of end grain I’ll see on the real piece. If I skip that, the finish can look balanced from a distance and awkward up close.
My prep checklist is simple:
- Sand evenly, with the grain, and do not chase mirror-level smoothness.
- Remove every bit of dust after sanding, including inside profiles and corners.
- Test a sample board cut from the same stock, not a random scrap from another project.
- Use a conditioner that matches the stain chemistry, because oil-based and water-based systems are not interchangeable.
As Minwax explains, its oil-based conditioner is made to help soft or porous woods accept stain more evenly, it dries in about 15 minutes, and the stain should go on within 2 hours. I follow that window closely, because once I miss it, I’d rather sand lightly and restart than gamble on blotching. Once the surface is prepared, the next decision is which stain type gives you the most control.
Choose the stain type and tone with the final room in mind
The stain itself can either tame fir or exaggerate its quirks. I usually pick the product first and the color second, because the way the stain behaves is what determines whether the grain stays crisp or turns muddy.
| Stain type | Best use on Douglas fir | Strengths | Trade-offs |
|---|---|---|---|
| Oil-based penetrating stain | Furniture, cabinets, trim, doors | Rich color, long working time, classic look | Highest risk of blotching on uneven boards |
| Water-based stain | Interior projects where speed and lower odor matter | Dries faster, cleaner color, easier cleanup | Shorter open time and more chance of raised grain |
| Gel stain | Vertical surfaces, tricky boards, blotch-prone fir | Non-drip, more surface control, forgiving application | Can soften the grain effect a little |
| Dye or tinted topcoat | Light modern looks and subtle color correction | Even tone and good control over warmth or coolness | More technique-sensitive and usually needs a topcoat system |
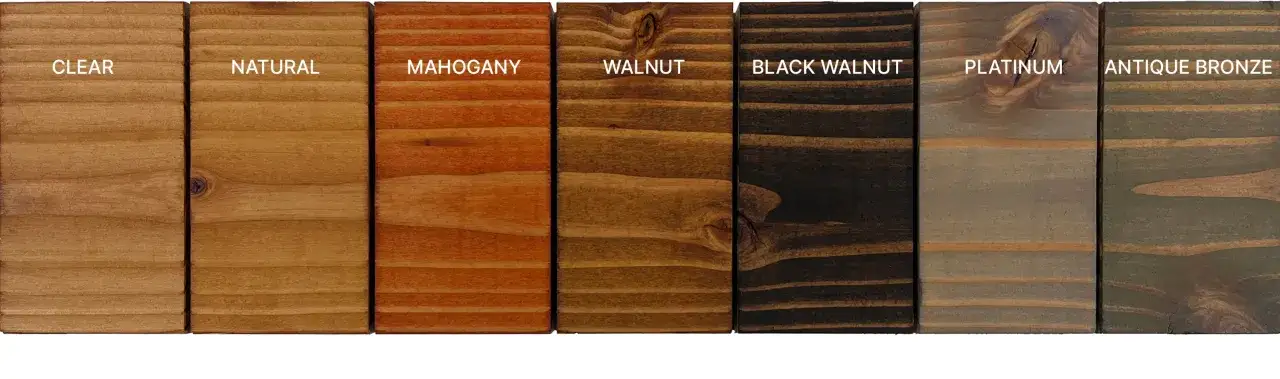
My short rule is this: oil gives depth, water gives speed, and gel gives control. On Douglas fir, I reach for gel stain more often than people expect, especially on doors or tall trim pieces, because it stays where I put it and helps reduce the streaky look that can show up with thinner stains. General Finishes even points out that Douglas fir is difficult to stain evenly, which matches what I see in practice. If I want a softer, more contemporary interior, I usually test a medium walnut, smoked oak, or muted neutral-brown tone first, because those colors calm the pink or orange cast without hiding the grain.
That product choice sets the tone for the finish, but the application still has to be disciplined or the board will fight back.
Apply the stain with control, not speed
I never treat fir like a quick wipe-on, wipe-off job. The best results come from working in manageable sections and watching the wood, not the clock. The first coat should make the grain look intentional, not saturated into a single flat color.
- Stir the stain thoroughly before and during use so the color stays consistent.
- Apply with the grain using a brush, pad, or lint-free cloth.
- Cover one section at a time so you can wipe evenly before the stain starts to grab.
- Watch the end grain and knots closely, because they usually darken faster than the face grain.
- Let the first coat dry completely before you decide whether you need a second one.
I also avoid the urge to “fix” a light first coat by loading on more stain immediately. That usually muddies the grain and makes the board look tired instead of richer. If the color is too light after drying, I prefer a second controlled coat or a toner-style adjustment over a heavy rescue pass.
One thing I never skip: I handle oily rags safely. They can self-heat, so I either lay them flat to dry outdoors or place them in a sealed metal container filled with water, depending on the product label and disposal rules. That is a small step with real consequences, especially in a busy shop or garage.
Once the color is right, the final result depends on whether the piece lives indoors or has to survive weather.
Interior and exterior projects are not the same job
Inside the house, stain is mostly about color and style. Outside, it becomes part of a protection system. Douglas fir is strong for its weight, but it is still a softwood with only moderate natural decay resistance, so I do not rely on stain alone to protect an exterior project.
| Project type | What I prioritize | Better finish direction | Main risk |
|---|---|---|---|
| Interior furniture | Color depth and evenness | Oil or gel stain plus a clear topcoat | Blotchiness and end-grain darkening |
| Interior trim or doors | Consistency across long surfaces | Gel stain or a well-controlled water-based system | Lap marks and uneven sheen |
| Exterior doors and trim | UV and moisture resistance | Exterior-rated stain and topcoat system | Weathering, fading, and early failure |
| Horizontal outdoor surfaces | Wear and water shedding | Use only if the product is designed for that exposure | Standing water and faster breakdown |
For exterior fir, I want pigment in the system because pigment helps slow UV damage. Clear-only finishes can look great on day one and disappointing not long after that if the piece gets direct sun. If the project is a front door, porch trim, or a west-facing exterior wall, I’d rather choose a product designed for outside use than try to make an interior stain do work it was never meant to do. Once you understand that split, the common mistakes become much easier to avoid.
Fix the problems before they become permanent
Most staining mistakes on Douglas fir fall into a few predictable buckets, and I prefer to correct them early rather than bury them under more finish.
- Blotchy patches usually mean the board was sanded unevenly or the stain soaked in at different rates. I sand back lightly and retest rather than adding another heavy coat.
- Dark end grain is normal to a point. If it is too strong, I seal it lightly next time or adjust the sanding sequence.
- Tacky or gummy stain usually means too much product, poor wipe-off, or not enough dry time. More patience fixes more of these problems than more stain does.
- Uneven sheen comes from rushing the topcoat. I use thin, even coats and keep the sheen consistent across the whole project.
If the blotching is mild, a shellac washcoat can help. That is a thin sealing layer that slows down absorption without fully hiding the wood. It is especially useful when I want fir to look smoother but still look like fir. If the staining is truly off, though, I stop trying to rescue it with color and start over. That is slower, but it usually gives a cleaner result.
From there, the real question becomes what finish plan I’d trust on an actual project, not just in theory.
The finish plan I trust on real Douglas fir projects
For an interior bookcase or coffee table, I like a measured approach: sand cleanly, use conditioner if the board is thirsty or uneven, choose a medium brown or softened walnut tone, and seal it with a clear protective finish after the stain dries. That combination keeps the grain visible without letting the earlywood dominate the whole look.
For a more modern built-in, I usually test a lighter stain or a tinted topcoat instead of forcing a dark color onto a board that wants to stay warm. Fir can look expensive when it stays honest. The trick is to refine the color, not erase the species.
For exterior work, I treat the finish as maintenance, not decoration. I check the surface seasonally, pay attention to sun exposure, and plan for recoating before the finish is visibly failing. That habit saves more labor than any miracle product ever will.
If I had to reduce the whole process to one rule, it would be this: test first, stain lightly, and let the wood’s grain stay part of the design. Douglas fir gives you a lot of character for free, and the best finish is the one that makes that character look deliberate rather than forced.