Hanging art looks simple until a frame ends up crooked, too high, or tearing a patch of drywall. Knowing how to hang a picture the right way keeps the wall clean, the frame level, and the art secure. I usually treat it as a small installation job: match the hardware to the wall, size the support to the weight, and place the piece where the room can actually live with it.
The safest method depends on the wall, the frame weight, and the finish you want
- Light frames can often use a basic picture hook or adhesive strip on smooth, painted surfaces.
- Medium and heavy pieces need hardware chosen for the wall type, not just the frame size.
- In many U.S. homes, studs are spaced 16 inches apart, which matters when a piece gets heavier.
- A strong default placement is 57 inches from the floor to the center of the artwork.
- Above furniture, 6 to 10 inches of breathing room usually looks balanced.
- Always rate hardware against the finished weight, including glass, backing, and wire.
Choose hardware that matches the job
The biggest mistake I see is starting with the frame and ignoring the load path. A small print in a light frame can hang very differently from a large framed photo with glass, backing board, and wire, so I always look at the finished weight, not just the artwork itself. As a rule, I like to buy hardware rated at least 25% above the actual weight; the extra margin is cheap insurance.
For budget planning in the U.S., a basic picture hanging kit usually runs about $6 to $15, a decent stud finder about $20 to $35, and heavier-duty anchors often about $2 to $20 per pack. That is still far less than repairing a wall or replacing broken glass.
| Hardware | Best for | Typical use | Limits and notes |
|---|---|---|---|
| Basic picture hook or nail | Small, lightweight frames | Quick drywall or plaster installs | Best for lighter pieces; not my first choice for wide or expensive art |
| Adhesive hanging strip | Rental-friendly, smooth walls | Light frames on clean, painted surfaces | Usually rated around 15 to 20 lb depending on the product; avoid textured walls, wallpaper, and humid spots |
| Drywall anchor with screw hook | Medium-weight art on hollow drywall | Frames that need more support than a nail alone | Requires drilling; choose the anchor for the actual weight and wall condition |
| Stud-mounted screw or hook | Heavier frames and mirrors | Best when you can line up with a stud | Strongest simple option, but the stud location controls placement |
| Toggle bolt or heavy-duty anchor | Plaster or hollow walls without a stud | Heavier pieces where a stud is not available | More invasive to install, but much more reliable for weight |
| French cleat | Large art, oversized mirrors, and valuable pieces | When stability and leveling matter most | More setup up front, but the load is distributed better and the piece sits flush |
I think of this choice as matching the wall, the backing, and the final use of the room. A guest-room print does not need the same system as a large entryway mirror, and the hardware should reflect that difference. Once the support is sorted, the next question is where the piece should actually live on the wall.
Place the picture at the right height before you drill
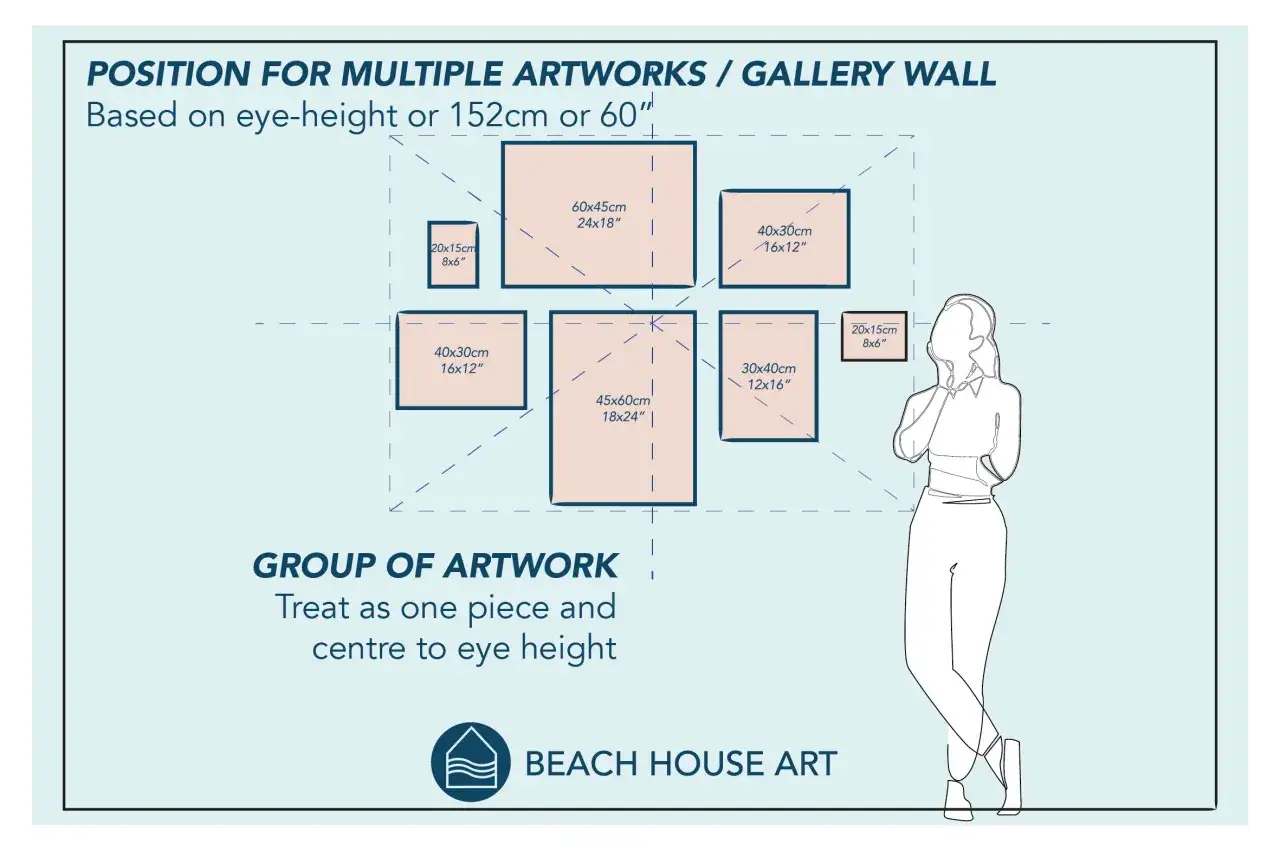
Artwork that is technically secure can still look wrong if it floats too high. My default is to place the center of the piece at about 57 inches from the floor, which usually reads as comfortable eye level in a residential setting. If the art goes over a sofa, console, dresser, or bed, I usually shift the bottom edge to about 6 to 10 inches above the furniture so the wall and the furniture feel connected.
For gallery walls, I try to keep the frames visually related instead of mechanically aligned. A spacing of 2 to 3 inches between pieces is usually enough to keep the arrangement unified without making it feel crowded. If the frames vary in size, I often center them on an imaginary line rather than forcing every top edge to match.
When I am planning a larger arrangement, I cut paper templates the size of each frame, tape them to the wall, and move them around until the composition feels balanced. That takes a few extra minutes, but it prevents the most obvious regret: putting holes in the wrong place.
Hang it straight the first time
Once the placement is set, the actual install should be boring. That is a good sign. I keep the process simple and repeatable, because picture hanging becomes messy when the order is improvised.
- Gather the tools first: pencil, tape measure, painter's tape, level, stud finder, hammer or drill, and the right hanger or anchor.
- Mark the centerline of the art and then mark the exact hanging point on painter's tape or a paper template.
- Check for a stud if the piece is heavy or if the wall can support one; in many U.S. homes, studs are 16 inches on center, though some layouts differ.
- Use the chosen hardware exactly as intended. For anchors, drill the right-size pilot hole; for hooks, set the nail at the recommended angle.
- Hang the frame, step back, and check the level from a few feet away rather than staring at it from arm's length.
- If the frame uses wire, make sure the wire sits naturally on the hook instead of being stretched tight or sliding side to side.
- Add felt bumpers or small spacers on the lower corners if the frame rocks, leans, or marks the wall.
If a frame is especially wide, I like to use two hanging points instead of one. That extra support keeps the piece from drifting over time and makes the visual line cleaner. From there, the real work is avoiding the habits that create damage in the first place.
Avoid the mistakes that lead to crooked frames and wall damage
Most hanging problems are not mysterious. They come from a few predictable errors that are easy to avoid once you know what to watch for. I see the same ones over and over, especially in rooms where the wall finish or the weight of the art was underestimated.
- Using hardware for the frame, not the finished piece. Glass, backing, and wire add weight, so I always weigh the whole item.
- Trusting a drywall nail for a heavy frame. A bigger piece needs a stud, a better anchor, or a cleat.
- Hanging too high. Empty wall space above furniture can tempt people upward, but the room usually looks better when the art connects to the furniture below.
- Skipping the wall type check. Plaster, tile, brick, and textured walls all behave differently, and adhesive strips are not universal.
- Rushing fresh paint. Adhesive hardware performs best on fully cured paint, not on a wall that is still drying.
- Ignoring vibration and traffic. Hallways, stairwells, and doors that slam can loosen weak hardware faster than a quiet bedroom.
When I need to choose between two options, I usually take the less fragile one. A slightly more visible hook is a small tradeoff if it keeps a heavy frame from shifting every few weeks. That practical mindset leads naturally to the last piece of the puzzle: making the wall look finished, not merely hung.
The small finishing touches that keep the wall looking finished
Once the piece is up, the last 10% matters more than people expect. I look at the artwork from the room entrance, not from directly underneath it, because that is how it will actually be read in daily life. I also check the relationship to lamps, side tables, and nearby frames so the piece feels intentionally placed rather than dropped into the wall as an afterthought.
For larger or more valuable artwork, a French cleat is often worth the extra effort. It spreads the load, helps the frame sit flush, and makes leveling easier than trying to balance a heavy piece on a single point. In a rental, adhesive strips can still be the right answer, but only when the wall is smooth and the weight stays safely inside the product limit.
The cleanest installations are rarely the most dramatic. They are the ones where the support is stronger than expected, the height feels natural, and the wall starts to look like part of the room instead of a separate project. If I had to reduce the whole process to one rule, it would be this: use the right hardware first, then let the placement do the decorating.