Candle wax on a coffee table, rug, wall, or favorite throw is frustrating, but it is usually fixable if you treat it in the right order. Knowing how to remove candle wax is mostly about one rule: harden first, then lift the bulk, then clean the residue that stays behind. In this guide, I’ll walk through the safest methods for the surfaces that matter most in a home-decor setting, along with the mistakes that can damage a finish faster than the wax ever did.
The safest cleanup method is the one that matches the surface
- Start cold. Harden the spill with time or ice so it lifts instead of smears.
- Use a dull tool. A plastic scraper or old credit card is safer than a knife on most decor surfaces.
- Heat comes second. Paper towels and low heat remove the thin residue left in fibers and textures.
- Different materials need different tactics. Wood, paint, fabric, carpet, glass, and metal each respond differently.
- Colored wax is a two-part problem. Remove the wax first, then treat the dye stain or oily film separately.
- Test first when the finish is delicate. A hidden spot can save a painted wall, vintage piece, or specialty fabric.
Let the wax harden before you touch it
The first mistake I see people make is rushing straight in with heat or rubbing the spill while it is still soft. That only spreads the wax, pushes it deeper into fibers, and makes the cleanup bigger than it needs to be. My first move is always to let the wax cool completely, or speed that up with an ice pack or a sealed bag of ice wrapped in a cloth.
Once the spill is firm, the wax becomes brittle enough to lift in pieces. A dull plastic card, an old credit card, or a thin plastic scraper works best because it removes the bulk without gouging paint or scratching a tabletop. For small drips on decorative pieces, I usually work from the edges inward so the spill stays in one place instead of flaking everywhere.
- Wait until the wax is fully opaque and firm.
- Use ice for 1 to 5 minutes if you need the spill to set faster.
- Scrape gently at a low angle instead of digging under the wax.
- Collect the loosened bits with a paper towel before they scatter.
Once the thick layer is gone, the real cleanup begins, and that is where heat becomes useful rather than risky.
Use heat only after the bulk is gone
Heat is not the first move, but it is often the best second move. On fabric, carpet, wallpaper, and some sealed surfaces, the goal is to melt the thin wax film just enough that it transfers to something absorbent instead of sinking deeper into the material. The classic transfer method is simple: place paper towels or a clean white cotton cloth over the spot, then press with low heat so the wax moves out of the surface and into the towel.
I prefer an iron for textiles and carpet because it gives even, controlled heat. Set it to low or medium, keep steam off, and press in short bursts of about 3 to 5 seconds. Move to a fresh section of towel each time so you do not remelt the wax back into the fabric. A hair dryer is a better option when the surface is too delicate for direct contact, such as a painted wall or a large decorative object. Keep it about 4 to 6 inches away and use brief passes instead of holding it in one spot.
Heat is useful, but only when the material can handle it. That is why the next step is deciding which surface you are actually cleaning.
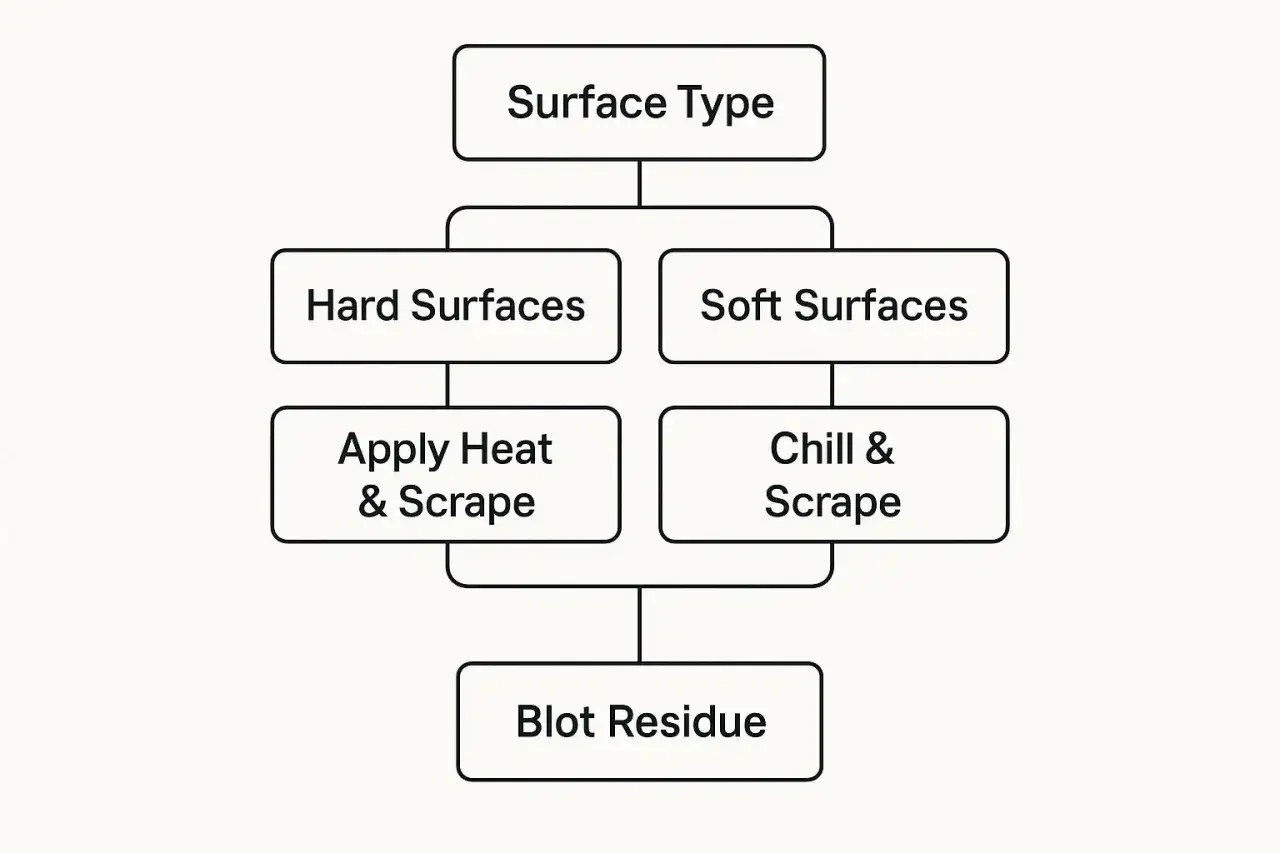
Know which surface you are cleaning
Wax behaves differently on hard decor surfaces than it does on porous ones. A smooth glass tray, for example, usually needs a simple scrape and wipe, while a woven rug may need heat, blotting, and a final stain treatment. The table below is the fastest way to match the surface with the right approach.
| Surface | Best first method | What to avoid | Practical note |
|---|---|---|---|
| Glass and ceramic decor | Let it harden, scrape with a plastic card, then wipe residue with rubbing alcohol or mild dish soap | Metal scrapers that can scratch or chip | Great for candle holders, trays, and jars with smooth finishes |
| Metal candle holders | Use warm water or gentle heat, then wipe dry | High heat on antique, plated, or weighted silver pieces | Sturdy modern metal is easy; delicate metal needs restraint |
| Wood furniture and floors | Harden, scrape lightly, then use low heat and a soft cloth | Soaking the wood or scraping aggressively | Finished wood is more forgiving than unfinished wood |
| Painted walls | Soften with a hair dryer, lift with a plastic scraper, then wipe the residue | Metal tools and boiling water | Always spot test first on flat paint or specialty finishes |
| Carpet and rugs | Harden with ice, lift the wax, then use paper towels and low heat to absorb the rest | Rubbing hot wax deeper into the pile | Vacuum after cleanup to reset the fibers |
| Fabric and upholstery | Harden, scrape gently, then press with paper towels and low heat | Steam and high heat on delicate weaves | Washable cotton is easier than silk, velvet, or cashmere |
For glass candle jars, I like to remove the solid wax first, then clean the inside with warm water and a bit of dish soap once the jar has cooled. For wood and painted walls, the trick is keeping pressure light and heat controlled, because the finish matters as much as the wax itself. That leads naturally to the surfaces that deserve the most caution.
Treat wood and painted walls with a light touch
Wood and painted drywall are the places where overcleaning causes more damage than the wax. On finished wood, I start with ice to make the spill brittle, then lift it with a plastic scraper or an old card. If a faint smear remains, I use a soft cloth and very mild heat to release the last trace, but I avoid saturating the surface. Unfinished wood is less forgiving, so any liquid should stay minimal and controlled.
For painted walls, low heat and patience work better than pressure. A hair dryer on medium heat, held several inches away, softens the wax so it can be lifted with a plastic edge. If residue remains, wipe with a barely damp cloth rather than a wet one, because too much moisture can mark the paint or leave a dull patch. I would also avoid going back and forth repeatedly with the scraper; one careful pass is safer than five aggressive ones.
If the wall or wood is textured, the wax may settle into grooves. In that case, the goal is to soften and blot, not scrape harder. Once you understand that difference, fabric cleanup starts to make a lot more sense.
Handle fabrics, upholstery, and carpet with transfer, not scrubbing
Textiles need a transfer method, not a scrubbing method. The spill should harden first, then be lifted, then be gently heated so the remaining wax moves into absorbent paper. On washable fabric, I like to place a few layers of plain paper towels or an unprinted brown paper bag over the stain, then press with a low-heat iron for a few seconds at a time. That pulls the wax out without forcing it deeper into the weave.
Carpet follows the same logic, but with a little more caution. After the wax firms up, lift off as much as possible with a dull knife or plastic card, then vacuum the flakes away. Put paper towels over the spot, press with low heat and no steam, and keep shifting to a clean section of towel. If the candle was colored, you may still see a faint tint after the wax itself is gone; that is normal and should be treated separately.
- For cotton and linen, low heat and a stain remover usually work well.
- For synthetic upholstery, keep heat lower and check the care label first.
- For silk, velvet, cashmere, or other delicate fabrics, I would lean toward professional cleaning.
- For carpet, vacuuming after the wax lifts helps restore the pile and removes loose crumbs.
When the material is washable, the wax cleanup is only half the job. The last trace is often a dye stain or oily film, and that needs its own step.
Deal with colored residue and the oily film separately
Colored candles can leave behind more than wax. Once the solid spill is gone, you may still have a dye stain, a faint greasy mark, or both. On hard surfaces, a little rubbing alcohol on a cloth can help cut that film; if you do not want to use alcohol, mild dish soap on a damp cloth is a safer fallback for many sealed surfaces. I always finish by wiping dry so the area does not collect dust or leave a streak against the decor.
On carpet or fabric, the finishing step depends on the material. A washable item can usually handle a spot treatment with liquid detergent or a fabric-safe stain remover, left to sit for about 15 minutes before laundering. For carpet, an oxygen-based cleaner can be a better choice for lingering color, especially when the stain is still visible after the wax has been lifted. Hydrogen peroxide can help on white carpet, but I would avoid it on dark fibers because it can lighten the material unevenly.
The important thing here is not to confuse the wax with the stain. The wax comes off first. The color, if any, is a separate problem, and treating both at once is usually what makes people overwork the surface.
Avoid the mistakes that make wax harder to remove
Most wax cleanup failures come from a short list of avoidable habits. The mess looks simple, so people hurry, scrub, or use the wrong tool. That turns a small spill into a finish problem.
- Do not rub soft wax. It spreads the spill and pushes it deeper into texture and fibers.
- Do not use steam. Steam adds moisture and heat at the same time, which can set stains or warp delicate surfaces.
- Do not use a metal blade on paint or glass. It can scratch, chip, or leave a permanent mark.
- Do not overheat wood or vinyl. Some finishes discolor, warp, or dull very quickly.
- Do not skip the spot test. A hidden test patch can prevent a much larger mistake on wallpaper, upholstery, or specialty finishes.
- Do not ignore the final residue. The wax may be gone, but the oily trace can still attract dirt and dull the surface.
Once you avoid those errors, cleanup becomes much more predictable. The last thing I think about is prevention, because the best wax removal job is the one you do not need to repeat.
Make the next spill easier on your decor
A candle can elevate a room, but it should not put your furniture or textiles at risk. I like to set candles on a heat-safe tray or coaster, especially on wood tables, console shelves, and bathroom counters. A slightly deeper tray catches drips before they travel, and it also helps the candle read as part of the decor rather than a hazard on top of it.
Placement matters just as much. Keep candles away from edges, drafts, and fabric runners, and trim the wick to about 1/4 inch so the flame stays steadier and the wax melts more evenly. That one small habit often reduces splatter far more than people expect. If you use warmers, do not overfill them, and make sure the dish is wide enough to contain the melt pool.
For me, the cleanest candle setup is the one that looks intentional before anything spills. A tray, a stable surface, and a quick cleanup kit in a drawer make wax damage much less likely, and they keep the room feeling polished even when the candles are doing exactly what they are supposed to do.