A basement bar works best when it feels like a natural extension of the house, not an afterthought tucked beside the furnace room. The best basement bar ideas balance layout, lighting, storage, and moisture control, because basements play by different rules than the main floor. I focus on spaces that look polished at night, work hard during gatherings, and still make sense when the room is quiet the rest of the week.
The smartest basement bar starts with layout, light, and moisture control
- Choose the bar type first: dry bar, wet bar, or a hybrid setup changes the budget and the build.
- Warm, layered lighting matters more underground than it does in a room with big windows.
- Plan storage for the way you actually entertain, not for a staged photo.
- Use moisture-tolerant finishes where condensation, spills, and damp air are most likely.
- Budget for plumbing, electrical, and finish carpentry before you start buying decor.
Choose the bar type that matches how you actually entertain
I always start here, because the type of bar determines almost everything else: cabinetry, plumbing, appliance choices, and even where the stools can go. If you mainly pour wine, mix simple cocktails, and want a good-looking gathering spot, a dry bar is often enough. If you host often and want a sink for rinsing glasses or mixing drinks without running upstairs, a wet bar earns its keep fast.
In current 2026 pricing, a built-in dry bar commonly lands around $2,000 to $10,000, while a wet bar often falls in the $6,000 to $22,500+ range depending on plumbing, cabinetry, and appliances. I like to think of the wet bar as a convenience upgrade and the dry bar as the smarter budget choice when the room is more about atmosphere than prep work.
| Bar type | Typical installed cost | Best for | Main tradeoff |
|---|---|---|---|
| Dry bar | $2,000-$10,000 | Smaller budgets, simple entertaining, lower-maintenance spaces | No sink, so cleanup still happens elsewhere |
| Wet bar | $6,000-$22,500+ | Frequent hosts, cocktail prep, easier cleanup | More plumbing, more moisture management, more cost |
| Hybrid bar | Usually between the two | Homes that need beverage storage, coffee service, and casual entertaining | Easy to overcrowd if you try to do everything at once |
If the basement already has rough-ins nearby, I strongly favor using them instead of forcing a sink across the room. The farther plumbing has to travel, the faster the project stops feeling like a decor upgrade and starts behaving like a renovation. Once that decision is clear, the style direction becomes much easier to define.

Styles that make the room feel intentional
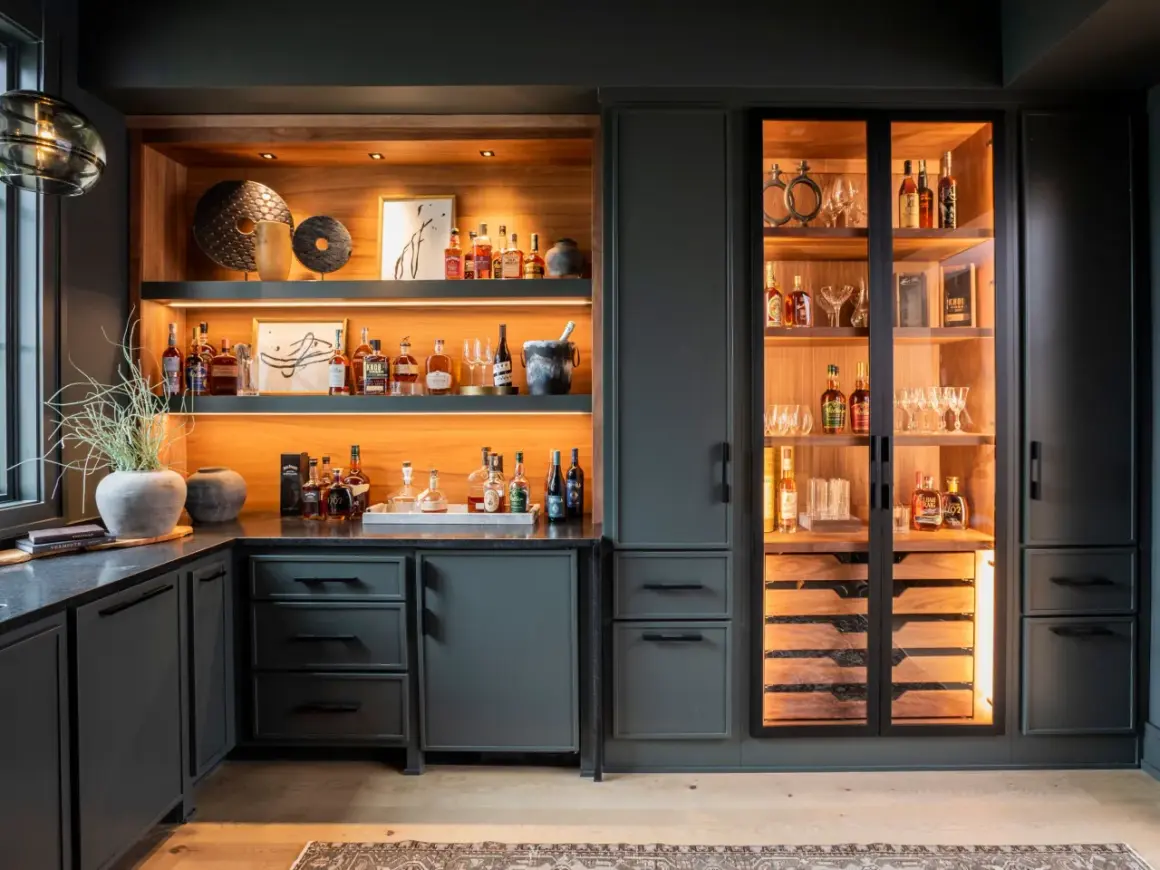
In 2026, the most convincing basement bars lean more lounge than novelty pub. I see warm wood, fluted cabinet fronts, stone or quartz counters, black or brass hardware, and subtle LED accents far more often than overly themed sports-bar looks. That shift makes sense: basements already have a mood, so the design should refine it instead of fighting it.
- Warm modern uses white oak, matte finishes, and clean-lined cabinetry to keep the room from feeling heavy. It works especially well in basements with low ceilings because the palette feels light without becoming bland.
- Moody lounge leans into charcoal, deep green, navy, or espresso tones with leather stools and dimmable lighting. I like this approach when the basement also holds a media room or game area, because the bar feels like part of a larger entertainment zone.
- Classic club brings in walnut, stone, mirrored backsplash panels, and glass-front storage. It has a more timeless feel and can look expensive without needing an oversized footprint.
- Casual family hangout uses durable surfaces, open shelving, and a beverage fridge instead of a full bar package. This is the version I recommend when the room needs to serve movie nights, homework, and weekend guests all in one go.
I avoid over-theming basement bars. One playful nod, like a vintage sign or a striking tile backsplash, is usually enough. Too many references at once can make the room feel staged instead of designed. The style works best when the lighting supports it, which is where a lot of basement projects either come alive or fall flat.
Layer the lighting so the basement feels warm, not flat
Basements rarely forgive weak lighting. A single ceiling fixture can leave the bar looking unfinished, no matter how good the cabinets are. I prefer a layered plan: one level for general light, one for task work, and one for atmosphere.
For most basement bars, I aim for dimmable ambient lighting with warm bulbs in the 2700K to 3000K range. That gives the room a softer tone and keeps skin, wood, and glass looking natural. Then I add under-shelf LEDs or under-cabinet strips for the work surface, and a third accent layer if the space needs drama, such as backlit shelving, toe-kick lighting, or a small picture light over art.
Read Also: Small Office Decor Ideas - Maximize Space & Style
What usually works best
- Recessed lights for general illumination, especially if the ceiling is low.
- Under-cabinet strips for task lighting over the counter and sink.
- Accent lighting for bottle shelves, glass fronts, or textured backsplash materials.
- Dimmers so the bar can shift from practical prep mode to evening lounge mode.
My rule is simple: if the room needs the overhead lights on full blast to look good, the lighting plan is not finished yet. Once the room glows properly, you can start making smarter decisions about storage and seating, because the proportions matter just as much as the finishes.
Build storage and seating around real use
A basement bar should not only look good on day one; it should stay functional after the first dozen gatherings. That means planning the storage for bottles, tools, glassware, snacks, and cleaning supplies before you pick decorative accessories. I prefer closed storage for the practical mess and a smaller amount of open display for the pieces that are worth showing off.
| Element | Good target | Why it matters |
|---|---|---|
| Bar height | About 42 inches | Feels like a true bar and pairs with standard bar stools |
| Counter height | About 36 inches | Useful if the bar also needs to function as a prep surface |
| Counter depth | 24 to 30 inches | Deep enough for service without eating the room |
| Overhang | 10 to 12 inches | Leaves room for knees and makes seated use comfortable |
| Stool height | 24 to 26 inches for counter height, 28 to 30 inches for bar height | Prevents awkward seating angles |
| Clearance behind stools | 36 to 42 inches | Keeps traffic flow from feeling cramped |
I also like to think about appliances in terms of how often they will actually be used. A beverage fridge is usually more valuable than a full-size refrigerator in a basement bar, unless the room doubles as a guest suite. An ice maker sounds appealing, but it only makes sense when you entertain often enough to justify the space and maintenance. If you add a sink, a dishwasher drawer can be useful in a larger setup, though it is easy to overbuild if the bar is mostly for casual use.
Storage and seating decisions lead straight into the budget, because the more functional the bar becomes, the easier it is to overspend on features that will not earn their footprint.
Budget for the visible finish and the hidden work
The most common budgeting mistake is spending on finishes before accounting for what has to happen behind the wall. Cabinet fronts, backsplash tile, and lighting can be edited later. Plumbing, electrical, venting, and moisture control are much less flexible. I would rather see a simpler bar done well than a luxury-looking bar with rough utility work hidden behind it.
| Project scope | Typical 2026 range | What usually pushes the cost up |
|---|---|---|
| Freestanding bar cart or cabinet | $150-$2,000 | Better materials, custom styling, integrated storage |
| Prefab dry bar | $1,000-$6,500 | Size, finish quality, shelving, delivery and install |
| Built-in dry bar | $2,000-$10,000 | Carpentry, countertop material, lighting, trim detail |
| Wet bar | $6,000-$22,500+ | Plumbing runs, sink, backsplash, electrical, appliance upgrades |
| Custom basement buildout | $15,000-$30,000+ | Premium cabinetry, specialty stone, full room finish-out |
The hidden work tends to be the real budget driver. Long plumbing runs, added circuits, permits, and finish carpentry can move the number far more than a different cabinet color ever will. If the basement is already finished, I would spend first on the pieces that improve daily use: durable counters, good lighting, and quiet appliances. That approach also makes the room easier to protect, which matters a lot below grade.
Protect the room from the issues basements are known for
Basements are where decorative ambition meets practical reality. Moisture, humidity, and cooler air can ruin otherwise beautiful finishes if you ignore them early. Before I choose tile or stain color, I want to know how the room behaves in different seasons.
The first priority is keeping humidity under control. In many homes, a target of roughly 30% to 50% relative humidity is a sensible range to aim for, especially if the bar includes wood, paper-backed materials, or a sink area. If the basement has any history of seepage, odor, or condensation, I would address that before installing cabinetry.
- Use moisture-tolerant flooring such as luxury vinyl plank, porcelain tile, or sealed concrete near the bar.
- Avoid solid hardwood in damp-prone basements, especially around sinks or exterior walls.
- Choose finishes that tolerate splashes, including sealed stone, tile, or moisture-resistant panels behind the work area.
- Plan for ventilation if the bar will produce heat, humidity, or a lot of occupied hours.
- Add GFCI protection and permitted electrical work wherever local code requires it near water or a sink.
I also like leak-detection sensors in wet-bar zones, because a small spill under a cabinet can become a much bigger repair if nobody sees it. These are the unglamorous details that keep the bar looking good two years later, not just the week it is installed. Once the room is protected, the styling choices become safer to layer in.
Finish with details that make the bar feel collected
The best basement bars do not look decorated all at once. They feel edited. I prefer a few strong choices over a pile of small ones, because clutter is the fastest way to make a basement bar feel like a storage nook with stools.
Start with one focal point. That might be a stone backsplash, a mirrored panel, a piece of art, or a line of backlit shelves. Then add a restrained palette of two or three materials and repeat them with confidence. For example, white oak plus matte black hardware plus a textured backsplash already gives the room enough character. A fourth or fifth competing material often just creates noise.
- Use one reflective surface if the basement needs brightness, but do not overdo mirrors.
- Choose bar stools that fit the architecture, not just the countertop color.
- Display bottles and glassware sparingly so the shelves read as designed, not crowded.
- Bring in one soft layer, such as a rug or upholstered seating, to keep the room from feeling hard and echoey.
- Keep the decor functional with trays, a shaker, glassware, and storage that are actually used.
If you want the space to feel current in 2026, I would favor warmth, texture, and restraint over novelty. A basement bar does not need to shout to feel memorable. It needs to feel like a room where people want to sit for an hour, not just a room that photographs well for ten seconds.
What I would lock in before the first cabinet goes in
Before any materials get ordered, I would settle three things in this order: moisture control, layout, and lighting. Those are the decisions that make everything else easier, and they are far harder to correct later than a backsplash or paint color. After that, choose the smallest number of upgrades that support the way the room will actually be used, not the most impressive list of features on paper.
If I were narrowing the project to a practical checklist, it would be this: keep the path around the stools open, make the work surface easy to clean, and give the room enough warmth to feel like part of the house. The smartest bar in a basement is not the flashiest one. It is the one that still feels calm, usable, and well put together long after the novelty wears off.