A curated children's art wall works best when the display system, spacing, and rotation plan all support each other.
- Choose one main hanging method so the wall feels cohesive instead of improvised.
- Use 2 to 4 inches of spacing between pieces for a cleaner gallery read.
- Keep the midline around 60 inches when the wall stands alone, or leave 6 to 8 inches above furniture.
- Limit the palette to one or two frame finishes and a consistent mat color.
- Plan for rotation so the wall can change without becoming cluttered.
Why a children's art wall works in real homes
What makes this kind of display so effective is that it solves two problems at once. It gives your child's work a proper place, and it turns everyday family creativity into a real design moment instead of a pile on the fridge or in a drawer. In a hallway, bedroom, playroom, or family room, that shift matters because it makes the home feel lived in without feeling messy.
I also think a well-edited art wall does something subtler: it tells a story. A wall of hand-drawn houses, bright abstract paintings, or school projects instantly reads as personal, which is often exactly what a home needs. The key is giving the pieces enough structure that they feel collected, not random. Once that purpose is clear, the next decision is how the display itself should work.
Choose the display format that fits your pace
The best hanging system depends on how often you want to swap artwork and how polished you want the wall to feel. If the pieces will change every few weeks, flexibility matters more than perfect symmetry. If the wall is part of a living room or entry, the frame language matters more than speed.
| Display method | Best for | Why it works | Rough budget | Trade-offs |
|---|---|---|---|---|
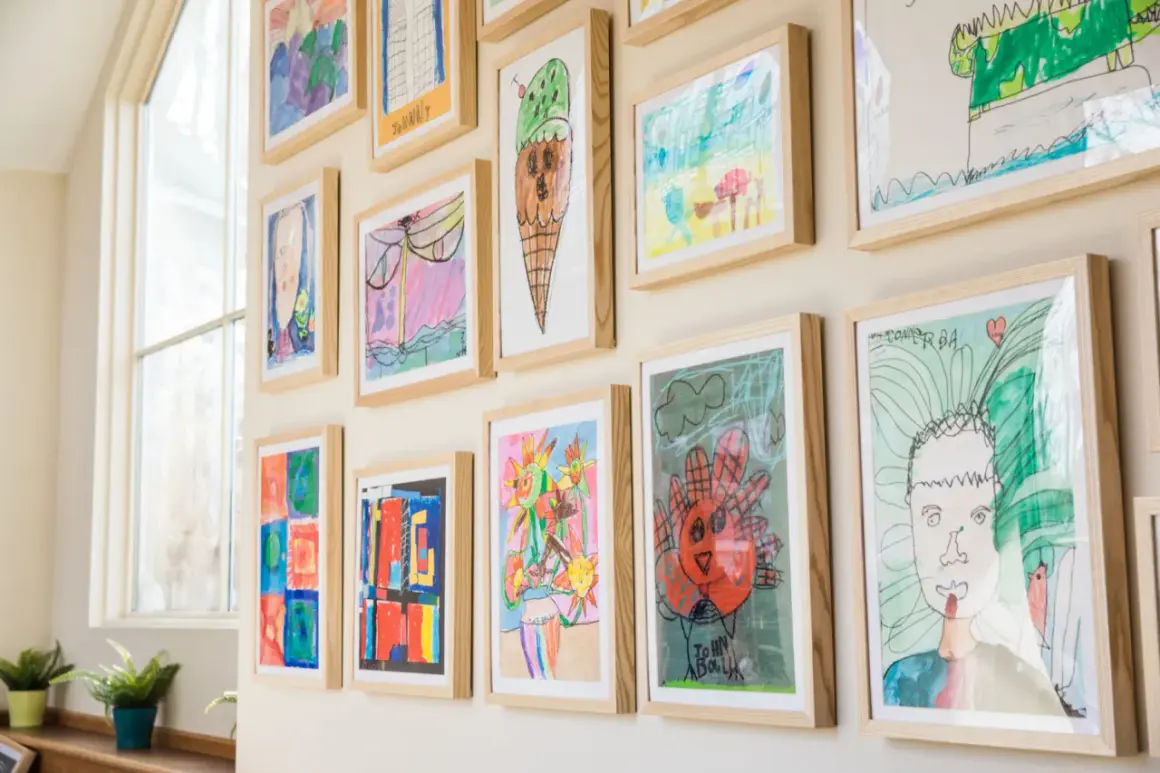
| Matching frames with mats | Living rooms, hallways, and more formal spaces | Creates the most finished look and makes small artwork feel elevated | $120 to $500+ for a small wall | More upfront work and slower to update |
| Clips or wire displays | Playrooms, craft corners, and bedrooms | Fast to change and easy to build on over time | $25 to $120 | Can look casual if too many styles are mixed together |
| Picture rail | Rooms that need a flexible, elevated look | Lets the art evolve without redoing the whole wall | $80 to $250+ for hardware, plus install | Works best when the wall height and mounting conditions are right |
| Floating ledge | Larger pieces and mixed media | Easy to rearrange and good for layered displays | $40 to $150 | Can turn cluttered if overloaded |
| Corkboard or pinboard panel | High-rotation areas and school-age kids | Very practical for notes, awards, and frequent updates | $30 to $120 | Reads more casual than a framed gallery wall |
If I were choosing for a main living area, I would lean toward matching frames or a picture rail because both keep the wall feeling deliberate. If I wanted something more playful and changeable, I would go with clips or a ledge. The important part is not mixing every system at once unless you want the wall to feel intentionally eclectic.
The next step is planning the layout so the display reads as one composition instead of a collection of separate pieces.
Plan the layout before you drill any holes
This is the part I never rush. A simple paper mockup saves more time than guessing with a tape measure and then moving everything three times. I usually start by measuring the full wall and, if there is furniture below it, the width of that piece too, because the art should feel anchored to the room, not floating in isolation.
- Cut paper templates to match the frame sizes you plan to use, then tape them to the wall.
- Arrange the templates on the floor first if you want to test several compositions.
- Keep most pieces 2 to 4 inches apart so the grouping breathes.
- For a standalone wall, keep the visual midline around 60 inches from the floor.
- If the wall sits above a console, dresser, or bench, leave about 6 to 8 inches of space above the furniture.
- On a larger wall, aim to fill roughly 70 to 75 percent of the visible area so the arrangement feels intentional.
My own rule is to start with the strongest or largest piece and build outward from there. That keeps the composition grounded, especially if the artwork varies in size or orientation. Once the structure is in place, the wall feels calm enough to handle playful art without looking busy.
After the layout is set, the real difference comes from editing the artwork itself.
Curate the art so the wall feels edited
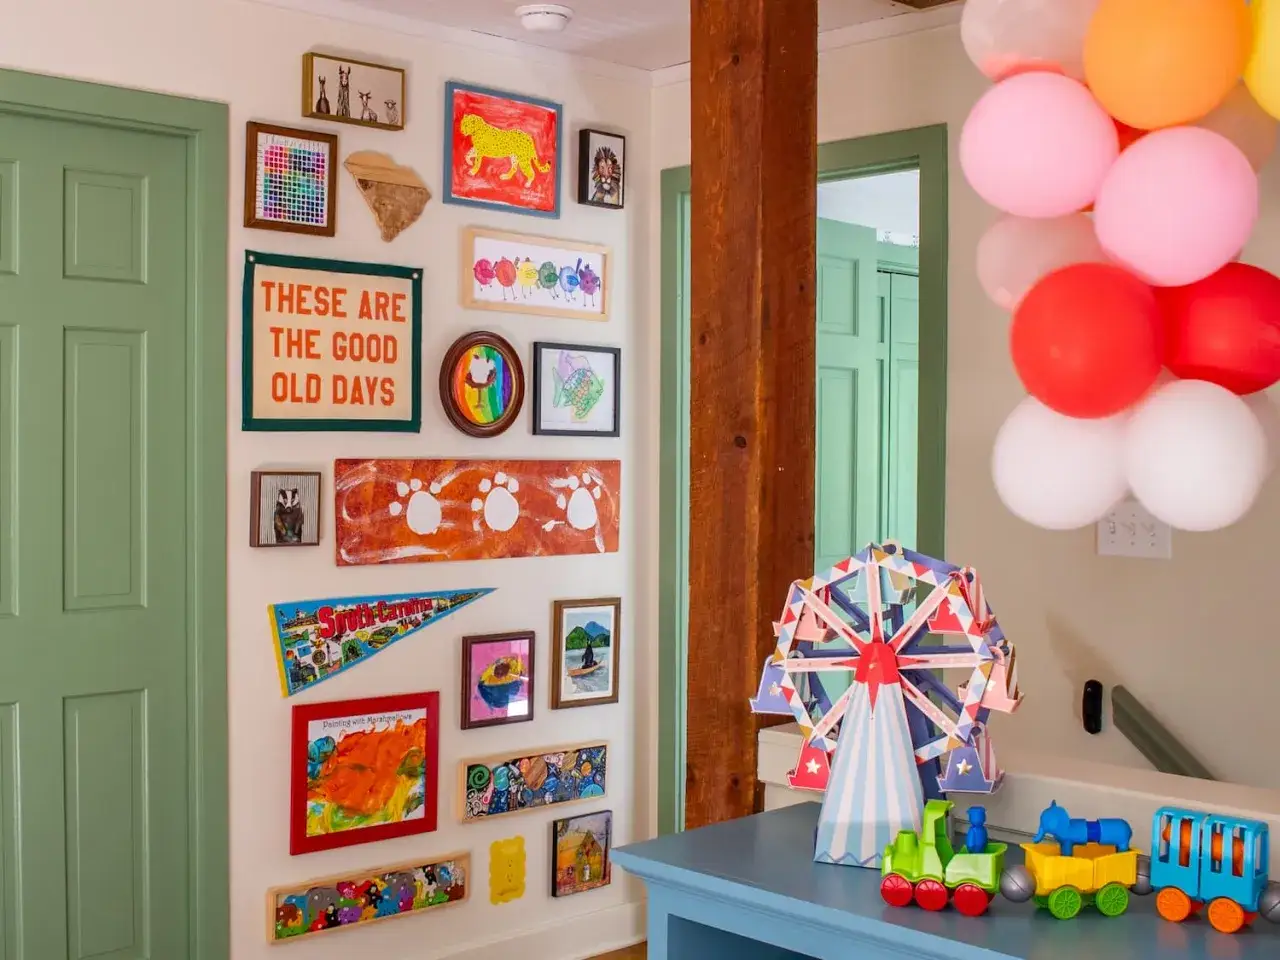
Not every piece needs to make the wall. In fact, the strongest displays usually leave out more than they include. I like to think in terms of a small exhibition: one hero piece, a few supporting works, and enough empty space for the eye to rest.
A useful filter is to ask three questions: Does it show your child's current style? Does it add a color or shape the wall needs? Does it feel worth framing, not just worth saving? If the answer is yes to all three, it belongs. If not, I would store it and keep the display lean. For a small to medium wall, 5 to 9 pieces is often enough to feel full without tipping into clutter.
Mats help a lot here. A simple white or warm off-white mat can make a child-sized drawing feel more finished, and it also gives smaller work more visual weight. I also like mixing media carefully: one painted canvas, one pencil sketch, one collage, maybe a school project. That variety feels collected, but only if the colors and frame widths still belong to the same family.
If you want to preserve more art than you can display, photograph or scan the overflow before you file it away. That way the wall can stay edited while the memories stay intact. From there, the final layer is making the display feel like part of the room instead of a separate project.
Make the wall match the rest of the room
A children’s art wall looks best when it relates to the room around it. That does not mean everything has to match perfectly. It means the frames, mats, and spacing should echo the room's furniture, textiles, or paint in a way that feels deliberate.
I usually limit myself to one or two frame finishes. Black frames and crisp white mats work well in modern rooms. Natural wood and linen-toned mats feel softer in warmer spaces. If the room already has patterned wallpaper, colorful bedding, or strong upholstery, I keep the art wall quieter so the eye is not fighting for attention.
There is also a meaningful difference between child-made and childish. I prefer the first. When the display respects the artwork instead of treating it like temporary clutter, the whole room feels more settled. That is especially true in homes where the wall is visible from shared living spaces, because the display becomes part of the home's overall design language.
Once the wall feels integrated, the last challenge is keeping it from becoming static or overcrowded.
Keep it easy to update as your child grows
A great display system should make change easy. Children's art arrives quickly, and if the wall cannot absorb new work without a full reset, it stops being useful. I like a rotation rhythm of every 4 to 8 weeks in active spaces such as playrooms, and every few months in quieter areas such as hallways or family rooms.
- Keep a flat storage box or portfolio for the pieces you are not displaying.
- Write the date, age, and medium on the back before archiving a favorite.
- Photograph standout pieces so you can keep the memory even after the original moves off the wall.
- Use lightweight frames or acrylic in busy rooms, and secure hardware properly into studs or anchors.
- Follow a one-in, one-out rule once the wall starts to look full.
That last point matters more than people expect. If every new drawing gets added without editing, the wall loses shape fast. A rotation plan keeps the display fresh and protects the strongest work from getting buried. It also makes the whole setup feel manageable instead of like one more household task.
With that system in place, the wall can keep growing without losing its design logic.
A simple formula that keeps the wall growing with the room
If I were starting from zero, I would choose one flexible hanging system, one consistent frame finish, and one storage box before hanging the first piece. That combination gives you enough structure to look polished and enough flexibility to keep up with new artwork. It also keeps costs sane, because you can start with a modest number of frames or clips and build the wall gradually.
The real goal is not to display everything. It is to make the best pieces feel seen, make the room feel intentional, and leave enough room for the next wave of creativity. When those three things line up, the wall stops reading like a temporary craft project and starts feeling like part of the home.