Removable sofa covers are easiest to live with when you know the cleaning rhythm: read the label, choose the right wash method, and dry them without forcing the fabric. Knowing how to wash couch cushion covers safely is mostly about restraint, not effort, because the wrong water temperature or heat setting can do more damage than the stain itself. I usually treat the care tag as the real instruction manual and the washer as a tool, not a shortcut.
The safest clean starts with the label and ends with slow drying
- Check the cleaning code before anything goes into the washer, because some upholstery is water-safe but not machine-safe.
- Use cold water, a gentle cycle, and a mild detergent when the label allows machine washing.
- Turn covers inside out, close zippers, and wash similar colors together to reduce wear and color transfer.
- Air-dry whenever possible, and reshape the fabric while it is still slightly damp.
- Pre-treat stains first so you do not have to rewash covers just to chase one spot.
- If the fabric is dry-clean only, backed with foam, or heavily textured, choose a safer alternative.
Start with the care tag, not the washing machine
The first decision is simple: can the cover handle water at all? A lot of people see a removable cover and assume it is laundry-friendly, but that is not always true. In the U.S., furniture labels often use cleaning codes instead of a full washing recipe, so the tag matters more than guesswork.
Here is the shorthand I use when I am deciding what to do next.
| Code | What it means | What I would do |
|---|---|---|
| W | Water-based cleaning is allowed | Use a water-based cleaner or follow the label carefully; it does not automatically mean machine washable |
| S | Solvent-based cleaning only | Skip the washer and use a dry-cleaning solvent or a professional cleaner |
| SW / WS | Either water-based or solvent-based spot cleaning is allowed | Spot clean first, then decide whether a deeper clean makes sense |
| X | No water or solvent cleaning | Vacuum and brush only, or call a professional |
One important detail: a “W” code is not the same thing as “throw it in the washer.” I make that distinction every time, because it is where a lot of shrinkage and fabric distortion starts. Once the tag gives you the green light, the actual wash is straightforward.
That brings us to the part most people want first: the practical washing steps that protect the fabric while still getting the cover clean.
Wash removable covers the careful way
When the label allows machine washing, I keep the process simple and gentle. The goal is to clean the cover without beating up seams, zippers, piping, or backing material.
- Remove the cover and shake out loose debris. A quick shake outside helps get rid of crumbs, pet hair, and dust before the washer has to deal with them.
- Vacuum or lint-roll the surface first. This matters more than people think, especially if you have pets or textured fabric that traps grit.
- Close zippers and fasteners. Open hardware can snag the fabric, twist inside the drum, or scratch other covers.
- Turn the cover inside out if the fabric is delicate. That protects the visible face of the material and helps reduce abrasion.
- Wash similar colors together. New or dark covers can bleed a little, especially on the first wash.
- Use cold water and a delicate cycle. That is the safest default for most washable sofa covers, and it lowers the risk of shrinking or warping.
- Choose a mild detergent and do not overdose it. Extra detergent does not equal extra cleaning; it usually means more residue left in the fibers.
If the covers are only lightly soiled, I like to keep the load small and avoid mixing them with heavy towels or jeans. A crowded drum rubs seams harder than the stain ever did. For one-off spots, I pre-treat before the wash instead of trying to make one cycle do everything.
Once the covers are washed, drying becomes the real make-or-break step, especially for cotton, linen, and blended fabrics that like to tighten when heat is added.
Dry them slowly so they fit back on properly
Drying is where good intentions often go sideways. Even when a cover survives the wash just fine, high heat can shrink it enough that it becomes a wrestling match to put back on the cushion. My default is simple: air-dry first, heat second, and only use heat if the label clearly allows it.
In practice, that usually means laying the cover flat on a drying rack or hanging it in a well-ventilated room. If the fabric is thick, expect it to take longer than a T-shirt or pillowcase. I usually plan for 12 to 24 hours of drying time, and heavier upholstery fabrics can need more.
- Reshape seams and corners while the fabric is still damp. This helps the cover dry in the right silhouette instead of settling into wrinkles.
- Avoid direct sunlight for long stretches. Sun can fade color unevenly, especially on darker or richly dyed fabrics.
- Use low heat only when the label permits it. Even then, I keep the cycle short and remove the cover before it is fully bone-dry if I want to avoid over-shrinking.
- Re-fit the cover when it is slightly damp, not wet. That small bit of flexibility often makes the zipper easier to close and the seams easier to align.
Fabric blend matters here. Cotton and linen tend to be less forgiving than polyester blends, while textured weaves and velvet-like fabrics may need a light brush after drying to restore the surface. If the cover comes out wrinkled, I would rather smooth it by hand or use a gentle steam pass from a distance than throw it into a hot dryer just to speed things up.
Before the wash ever begins, though, stains need their own plan. That is what keeps you from cleaning the whole cover twice for one spill.
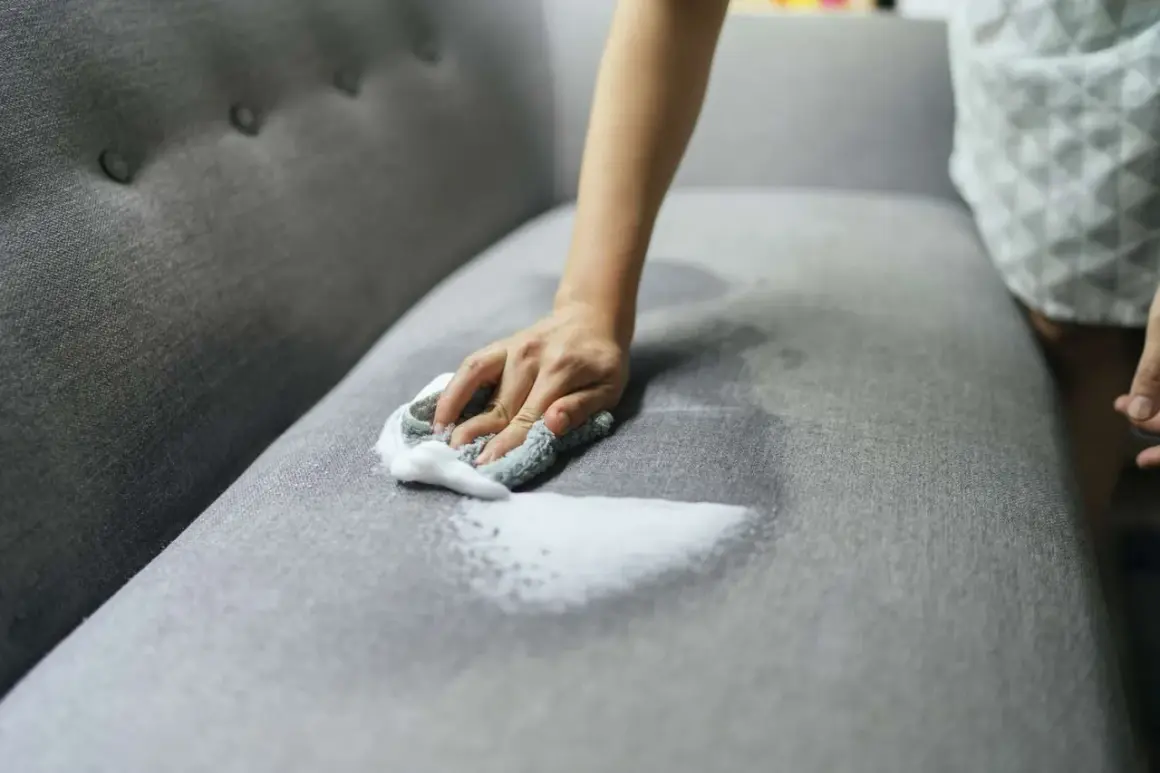
Treat stains before they become permanent
I separate stain treatment from washing because they are not the same job. Washing removes general soil; pre-treatment targets the mark that is actually bothering you. The trick is to blot, not scrub, and to match the approach to the stain type.
- Food and drink spills: Blot immediately with a clean cloth, then dab with cool water and a little mild detergent before washing.
- Grease or body oils: Use a fabric-safe degreasing pre-treatment sparingly and give it a few minutes to work before the wash.
- Pet accidents: An enzyme cleaner is often the better choice because it helps break down the residue that causes odor.
- Makeup or ink: Test first on a hidden area, because stronger stain removers can lift color as easily as they lift the stain.
I also test any cleaner on a hidden seam before I trust it on the visible face of the cover. That small pause is boring, but it saves a lot of regret. Once you know the cover can handle the pre-treatment, the next question is whether machine washing is even the right method at all.
Know when machine washing is the wrong move
Not every removable cover belongs in the washer, even if it looks sturdy enough. If the fabric is heavily textured, structured with foam backing, or labeled for dry cleaning only, I switch to a gentler method. The right choice depends on the fabric, the stain, and how much risk you are willing to take with fit and finish.
| Method | Best for | What to expect |
|---|---|---|
| Machine wash | Fully washable covers with simple construction and no delicate backing | Fastest clean, but shrinkage is still possible if you use heat |
| Hand wash | Delicate fabrics, lighter soil, or covers that need extra control | Slower, but safer for trimming, texture, and fit |
| Spot clean | Small stains, water-sensitive fabrics, or labels that restrict full washing | Good for maintenance, not enough for deep soil buildup |
| Professional cleaning | Expensive upholstery, dry-clean-only fabrics, or covers with stubborn odor or wear | More expensive, but the safest option when the fabric is fragile |
If the label is unclear, I choose the less aggressive method first. That is especially true for linen blends, velvet, and covers with piping or decorative stitching, because those details are usually the first to show wear. From there, the main goal is to avoid the mistakes that shorten a cover’s life long before the sofa itself wears out.
The mistakes that shorten the life of good covers
Most problems come from speed, heat, or overconfidence. I see the same handful of mistakes over and over, and almost all of them are avoidable.
- Using hot water by default. Hot water is one of the easiest ways to shrink a cover that fit perfectly yesterday.
- Skipping the stain pre-treatment. If you wash over grease or makeup without treating it first, the mark can set deeper.
- Overloading the washer. Heavy loads create more friction, more wrinkling, and more stress on seams.
- Putting covers in a hot dryer too soon. Heat is useful only when the label allows it, and even then I keep it conservative.
- Rubbing stains aggressively. Scrubbing frays fibers and can spread the stain outward instead of lifting it.
- Ignoring the fit after drying. If a cover feels tighter than before, that is a sign to stop and reassess before forcing the zipper.
When a cover comes out slightly smaller or misshapen, I do not panic and I do not keep pulling hard on the seams. I let the fabric relax, then smooth it back into shape while it is still a little flexible. That same patience pays off between full washes too, because a few small habits keep the whole sofa fresher for longer.
A simple routine that keeps the covers cleaner between washes
If I want removable covers to stay in good shape, I do not wait for them to look visibly dirty. I keep a light maintenance rhythm: vacuum weekly, blot spills immediately, and wash only when the fabric actually needs it. That keeps wear lower and fit more reliable.
- Vacuum seams and creases every week or two so grit does not grind into the fibers.
- Rotate or flip cushions regularly so one side does not take all the traffic.
- Deal with spills right away instead of letting them dry into the weave.
- Wash only as often as the fabric and use level require, not on a rigid calendar.
The practical answer to cleaning sofa cushion covers is usually less dramatic than people expect: read the label, use cold water if the fabric allows it, keep the cycle gentle, and dry slowly. Do that, and the covers look better for longer, fit better after washing, and hold up far better than they do under a rushed, high-heat routine.