A ceiling can do more than disappear into the background. A well-chosen accent ceiling can turn a plain room into the one people notice first, especially when the color, texture, or material actually works with the light and proportions of the space. This article breaks down when that move makes sense, which finishes are worth the effort, how to plan the proportions, and what a realistic DIY budget looks like in the United States.
The right ceiling choice depends on height, light, and how much texture the room can handle
- Paint is the fastest and cheapest way to add interest overhead, while wood, wallpaper, beams, and coffered details add more structure.
- Lower ceilings usually benefit from softer contrast; taller rooms can take bolder color and deeper texture.
- For a typical US room, paint-only materials often land around $75-$200, while pro painting is commonly $200-$500 for a standard ceiling.
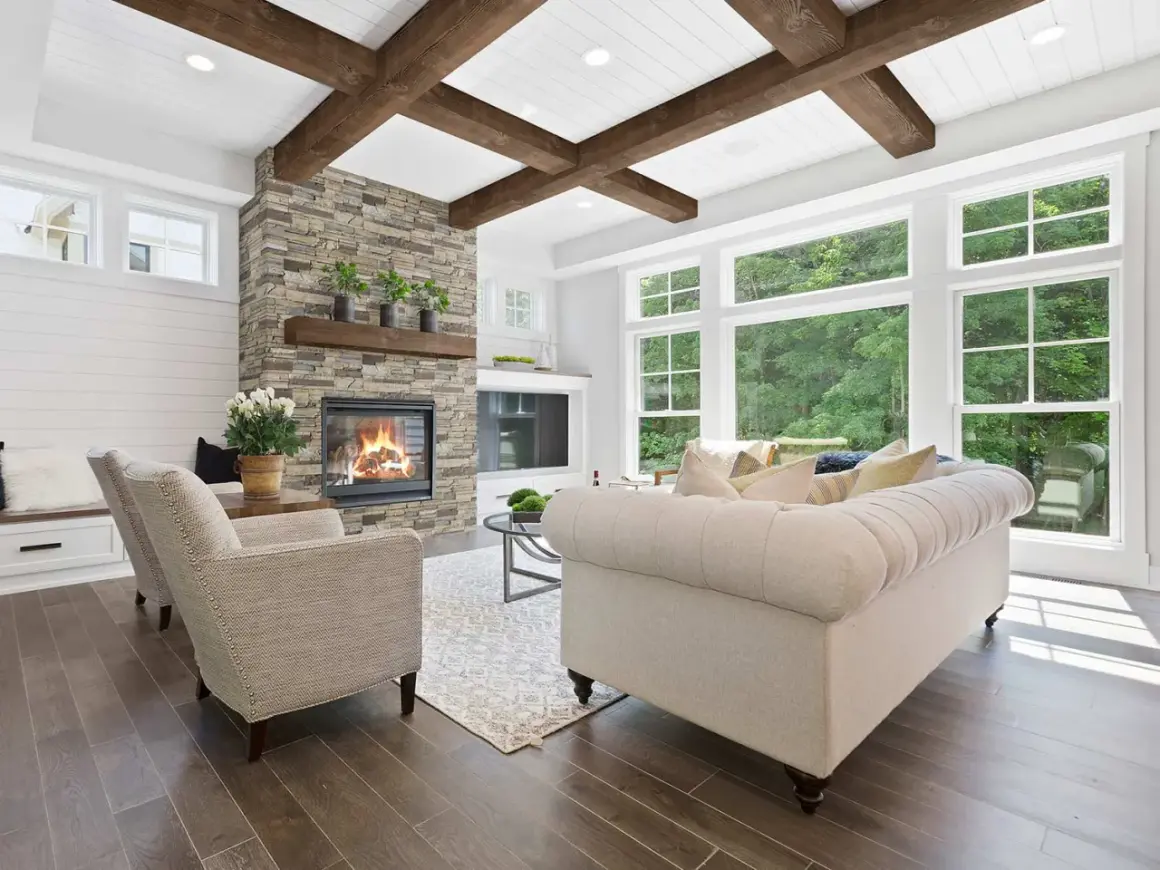
- Faux beams are a bigger commitment, with installed costs often around $1,500-$4,000 or roughly $15-$35 per linear foot.
- The best results come from careful prep, clean edges, and a finish that suits the room instead of fighting it.
When a ceiling should become the focal point
I start by asking what the room is missing. If the walls are already busy, the furniture is strong, and the lighting is doing a lot of work, the ceiling may not need to shout; it may only need to frame the space. But when a room feels flat, boxy, or unfinished, a statement overhead treatment can add shape fast, especially in rooms with simple trim and little architectural detail.
There is also a practical side. A deeper color can make a tall room feel more intimate, while a light-toned ceiling can keep a smaller room from feeling compressed. If the room already has multiple focal points, such as a dramatic fireplace, a patterned rug, and bold drapery, I usually keep the ceiling quieter so the space does not feel visually crowded.
- Best candidates: dining rooms, primary bedrooms, powder rooms, entryways, and open-plan zones that need definition.
- Riskier candidates: low basements with poor light, rooms full of competing patterns, or ceilings with serious damage that still needs repair.
- Good rule of thumb: if the ceiling will be seen straight on from multiple angles, keep the design calmer than you think.
In practice, dining rooms and powder rooms are the easiest wins, bedrooms can handle softer drama, and kitchens work well only when the finish can stand up to cleaning and humidity. Once you know the ceiling has a real job to do, the next step is choosing a finish that earns its place rather than just adding noise.
Which finishes are worth considering
The easiest way to judge the options is to compare how much character they add against how much work they require. I like to rank them by risk: paint first, then pattern, then texture, then full architectural changes.
| Finish | Look | DIY difficulty | Typical US budget | Best for | Watch-outs |
|---|---|---|---|---|---|
| Solid paint color | Clean, modern, and flexible | Easy | $75-$200 in materials for a standard room | Bedrooms, halls, dining rooms | Shows flaws if the sheen is too high |
| Tone-on-tone paint | Subtle and seamless | Easy | $75-$200 | Low ceilings and small rooms | Can feel flat if the room needs more contrast |
| Wallpaper or mural | Patterned and personal | Moderate | $100-$400 materials, depending on room size and paper choice | Powder rooms, nurseries, statement dining spaces | Seams, moisture, and alignment matter a lot |
| Wood planks or faux beams | Warm, architectural, and more permanent | Moderate to hard | Often $1,500-$4,000 installed, or about $15-$35 per linear foot | Living rooms, kitchens, vaulted spaces | Adds visual weight and needs careful layout |
| Coffered or grid detail | Classic, structured, and high impact | Hard | About $500-$1,500 in materials for a simple DIY grid, with professional builds costing several thousand dollars and up | Rooms with enough height and clean geometry | Precision is everything; sloppy spacing stands out immediately |
Faux beams are decorative hollow pieces that mimic real timber without the same weight or structural cost, while a coffered ceiling uses recessed panels in a grid to create depth. Those two moves make the biggest visual difference, but they also ask the most from your layout and prep.
My own bias is simple: paint is the best low-risk move, wallpaper is the strongest personality play, and beams or coffers are the right answer when the room needs architecture more than decoration. That distinction matters, because the finish should solve a problem, not create a new one.
From here, the real challenge is proportion. The same finish can look elegant in one room and awkward in another if the color or texture is too heavy for the ceiling height.
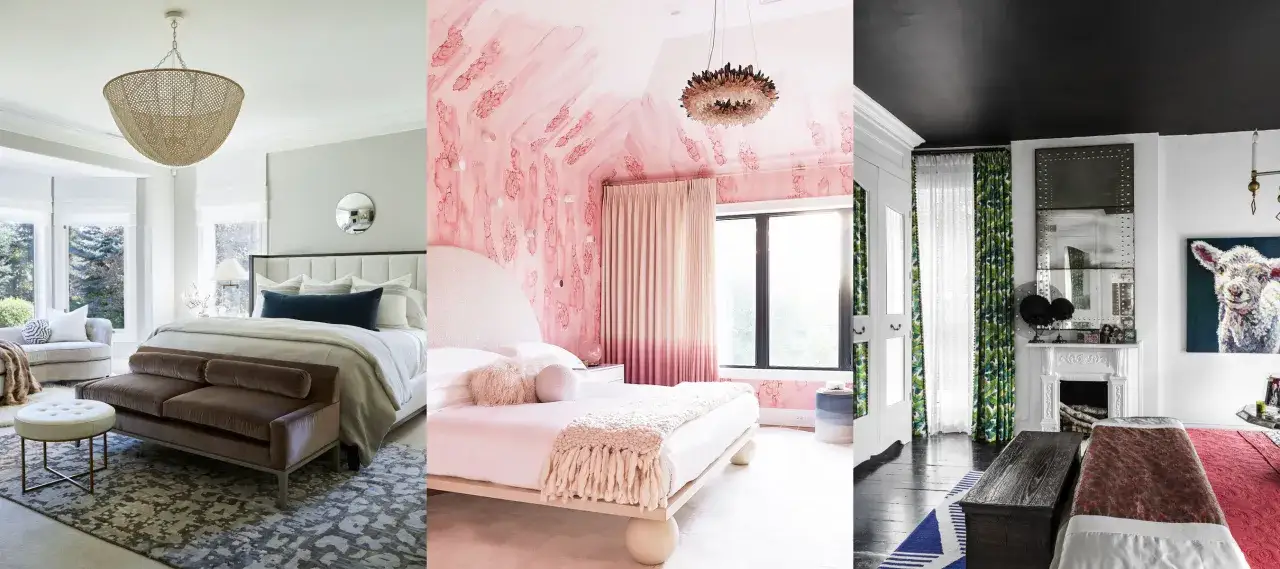
Choosing color, sheen, and proportion
I usually decide color in relation to height first, then light, then furniture. In a room under 8 feet, I tend to stay close to the wall color or use only a modest contrast, because a dramatic ceiling can make the room feel shorter than it is. In rooms around 8 to 9 feet, you have more room to play with a deeper shade or a subtle pattern. Above that, bolder color, beams, or a darker finish can actually make the room feel more grounded instead of heavy.
Start with how the room is lit
Natural light can soften a strong color, while dim or uneven lighting will exaggerate it. North-facing rooms often need warmer undertones to avoid looking cold, and darker spaces usually benefit from ceilings that reflect a little more light back down. If the room depends on evening lamps, I would test the color at night, not just at noon, because ceiling color changes a lot when the overhead light is the main source.
Pick the sheen for the surface you actually have
Flat or matte finishes hide minor flaws best, which is why I reach for them on most ceilings. A low-sheen eggshell or satin can work if the surface is very smooth and you want easier cleanup, but higher sheen will reveal patching, roller marks, and uneven drywall joints fast. Sheen, meaning how much light the surface reflects, should stay low on most ceilings unless the design is intentionally glossy.
Read Also: Paint Sheen Guide - Choose the Perfect Finish Every Time
Use contrast with restraint
If the walls are already colorful, the ceiling does not need to become the loudest element in the room. One of the cleanest approaches is to repeat a wall color on the ceiling at a slightly deeper value, then let the trim stay crisp and quiet. That gives the room a finished feel without turning the ceiling into a separate event.
- If you are going darker than the walls, use a tinted primer and expect two finish coats.
- If the ceiling has stains or repairs, prime the patches first or they will flash through the topcoat.
- If the room is under 8 feet, keep the ceiling color close to the wall color or use texture sparingly.
Once the color logic makes sense, the project becomes much easier to execute, which is where a simple DIY plan saves time and avoids the usual mess.

A practical DIY plan for painting or upgrading the ceiling
For a paint-only project, I keep the process boring on purpose. Boring means fewer mistakes.
- Clear the room as much as possible and cover everything with clean drop cloths.
- Remove or mask fixtures, smoke alarms, and anything that should not be hit with paint.
- Patch cracks, fill nail holes, sand repaired spots, and vacuum dust from the ceiling line.
- Prime stained areas, repairs, or any surface that is going from dark to light.
- Cut in the edges with an angled brush, then roll the center in manageable sections so the wet edge stays consistent.
- Use an extension pole and work in the direction that gives you the cleanest view of lap marks, usually toward the main light source.
- Inspect the ceiling after it dries in both daylight and evening light before you call it finished.
For a standard bedroom or dining room, paint-only work usually takes 4-8 hours of active time and one overnight cure, with another day added if patching or stain blocking is involved. If you are adding planks, beams, or a grid, the job changes from painting to precise measuring and fastening, so a laser level, accurate joist location, and prefinished materials save more time than any fancy finish ever will.
I also stop and reassess if the ceiling is old, damaged, or textured in a way that might hide a bigger problem underneath. If you are dealing with a surface that could contain hazardous material, testing comes before sanding or scraping, not after.
A simple painted ceiling is often a weekend project, but textured, vaulted, or beam-heavy work can stretch into several days once prep and cure time are counted. That brings up the next question most homeowners care about: what this is likely to cost in the real world.
What it costs and when to call a pro
In the US, a paint-only ceiling is still the most budget-friendly route. For a standard room, I would expect roughly $75-$200 in DIY materials for paint, primer, tape, and tools if you are starting from scratch. If you hire it out, ceiling painting commonly falls around $200-$500 for a typical room, and pricing around $1.37-$2.95 per square foot is a reasonable working range when the surface is straightforward.
In 2026, labor is still the biggest swing factor. Vaulted access, repairs, texture removal, and fixture work can move a straightforward room out of the budget range quickly.
| Project type | DIY material range | Typical pro range | Best reason to hire out |
|---|---|---|---|
| Paint-only ceiling | $75-$200 | $200-$500 for a standard room | Speed, clean edges, or difficult ladder access |
| Faux beams | $300-$1,200 depending on size and finish | About $1,500-$4,000 on average | You want a precise layout and secure fastening |
| Wallpapered ceiling | $100-$400 | Varies widely by paper and room complexity | Seams, pattern matching, and overhead handling |
| Coffered or grid detail | $500-$1,500 for a simple trim-based build | Often several thousand dollars and up | Symmetry, carpentry precision, and long-term durability |
I bring in a professional when the ceiling is vaulted, heavily patched, moisture-damaged, or full of electrical fixtures that need careful handling. I also lean pro if the design depends on perfect symmetry, because even small layout errors are much easier to see overhead than on a wall.
The budget question is only half the story, though. The other half is avoiding the small design mistakes that make a statement ceiling feel accidental instead of intentional.
The details that keep it feeling built in instead of added later
The most convincing ceilings are the ones that feel connected to the rest of the room. I look for four things every time: lighting that complements the finish, trim that keeps the edges sharp, furniture that repeats the ceiling's tone somewhere lower, and a surface texture that matches the room's use. If one of those is missing, the whole idea can feel pasted on.
- Match the ceiling treatment to one or two other elements in the room, not all of them.
- Keep pendant lights, fans, and recessed trim visually simple if the ceiling already has a strong presence.
- In open-plan spaces, use the ceiling to define a zone, not to fight the next zone over.
- Test large paint samples or wallpaper swatches on the actual ceiling before committing.
- Look at the room at night, when shadows and sheen become much more visible.
If I were planning this in a real house, I would start with paint, keep the contrast modest, and only move to beams or panels after the room proves it can carry more structure. That approach keeps the design durable, and a well-planned feature ceiling usually stays attractive long after the trend cycle moves on.