Crown molding changes a room faster than most people expect. The best crown molding ideas are the ones that match the ceiling height, the room’s style, and how much visual weight you actually want at the top of the wall. In this article, I’m focusing on the choices that matter in a real renovation: which profiles feel current, where they work best, what they cost, and how to install or finish them without making the room look busy.
What matters most before you choose trim
- Simple, clean profiles fit most contemporary renovations better than ornate shapes.
- Ceiling height should guide the size: about 2 to 4 inches for 8-foot ceilings, 3 to 3.5 inches for 9-foot ceilings, and 5 to 7 inches or more for taller rooms.
- Paint-grade MDF is usually the easiest budget option for dry rooms, while wood, PVC, and plaster each solve different design and durability problems.
- Color-matched molding feels quieter and more modern; contrasting trim creates a stronger architectural frame.
- Professional installation commonly lands somewhere around $4 to $23 per linear foot installed in the U.S., depending on material and complexity.
What crown molding actually changes in a room
I usually think of crown molding as a proportion tool, not just a decorative strip. It creates a clean transition where the wall meets the ceiling, hides small imperfections, and can make a plain room feel finished without adding furniture or accessories.
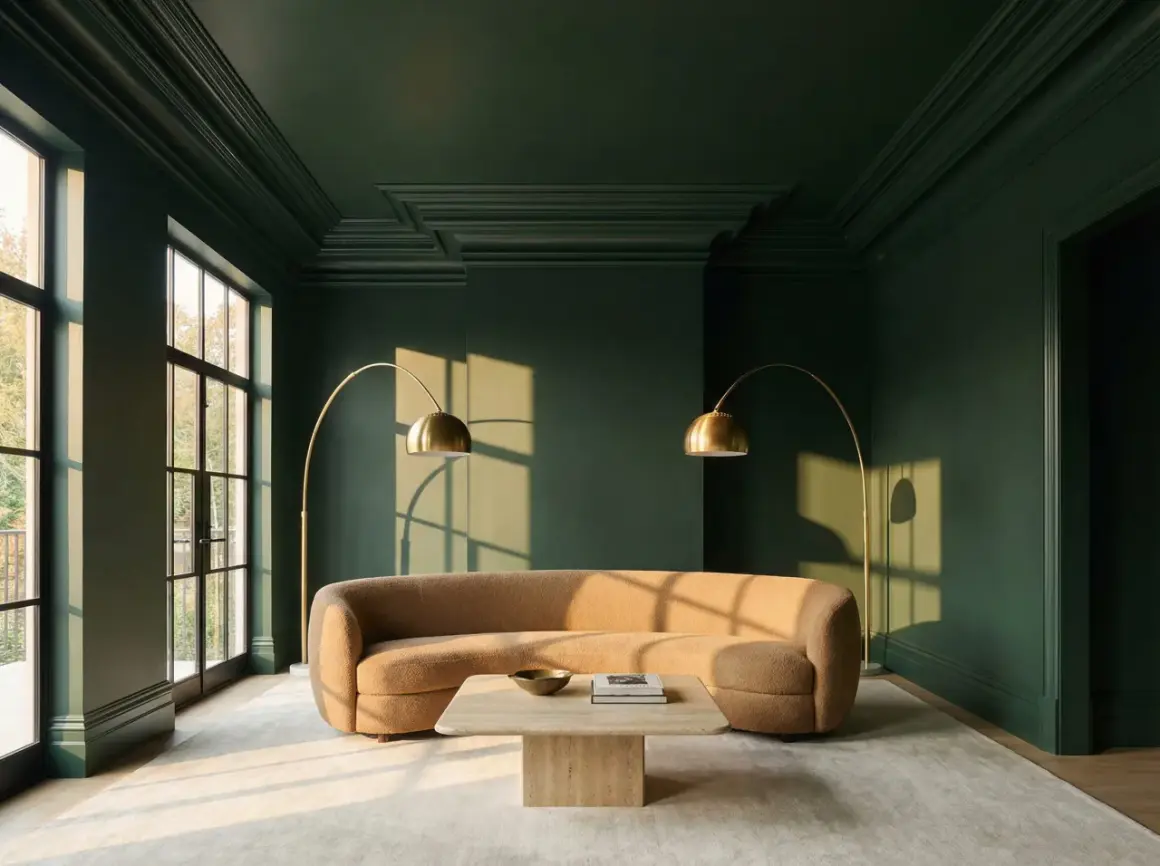
The effect depends on scale and color. A narrow profile painted the same color as the wall recedes quietly, while a wider, lighter, or layered profile pulls attention upward and makes the room feel more tailored. That is why some spaces feel calm with barely noticeable trim, while others need a bolder line to hold their own.
Right now, the strongest direction leans toward restrained profiles, softer curves, and finishes that integrate with the room instead of shouting for attention. Once you know what job the trim should do, the style choices become much easier to narrow down.
Style directions that feel current without looking generic
If I were choosing crown molding for a renovation today, I would start by deciding how visible I want it to be. Some homes need the molding to disappear into the architecture, while others benefit from a more deliberate statement.
| Style direction | What it looks like | Best use | My take |
|---|---|---|---|
| Minimal cove profile | A smooth, concave curve with little ornament | Modern, transitional, and smaller rooms | Quiet and flexible. It softens the ceiling line without making the room feel heavy. |
| Layered build-up | Two or more pieces combined for a custom look | Rooms with 9-foot-plus ceilings | This is the easiest way to make trim look high-end, but only if the room can handle the scale. |
| Color-drenched trim | Molding painted the same color as the walls or ceiling | Contemporary rooms, moody bedrooms, home offices | My favorite option when I want the architecture to feel intentional rather than decorative. |
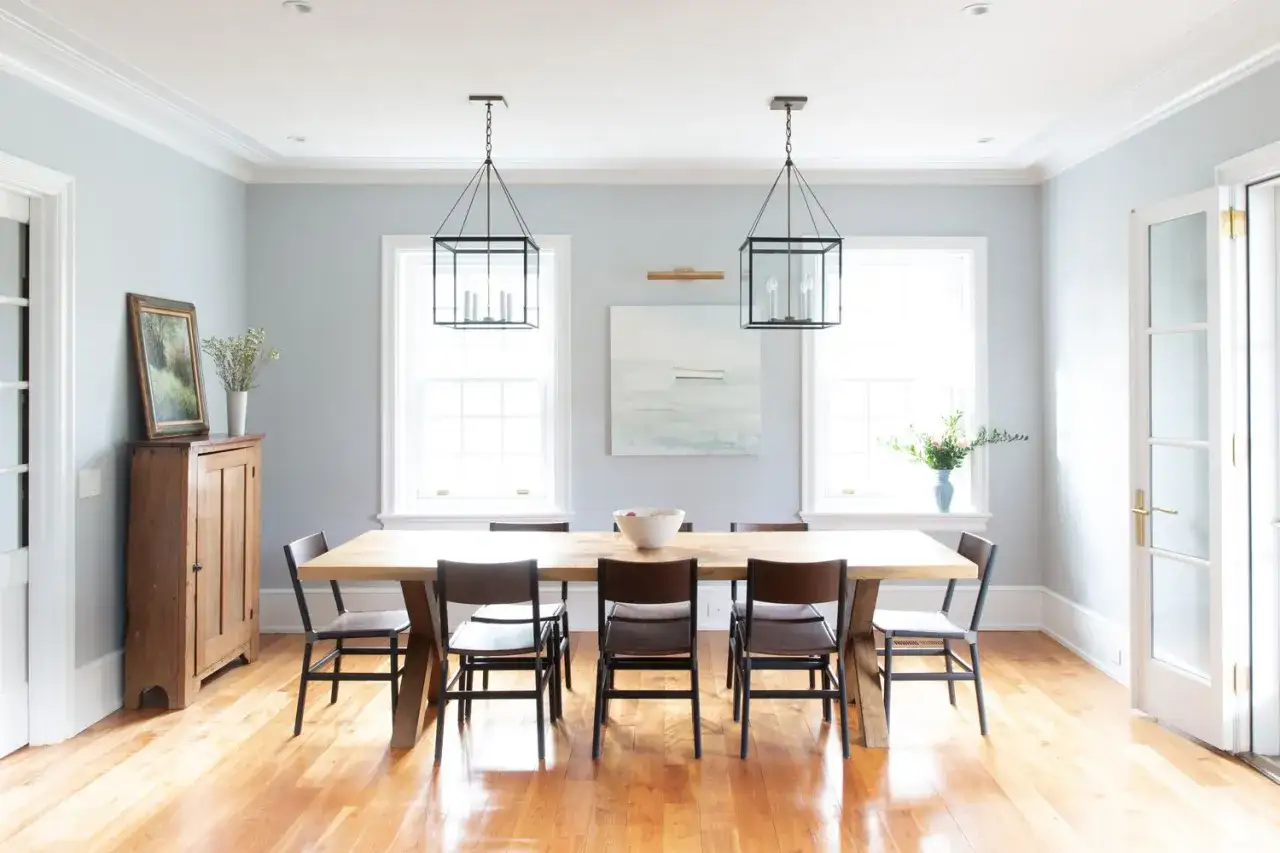
| High-contrast white trim | Bright trim against darker walls | Dining rooms, libraries, formal living rooms | Classic, but it works best when the rest of the room is edited and not overly busy. |
| Stained wood | Visible grain with a warmer, more natural finish | Craftsman homes, rustic interiors, oak-heavy rooms | Best when the wood tone connects to other finishes; otherwise it can feel disconnected. |
| Dentil or stepped trim | Traditional profiles with repeating block details | Period homes and formal spaces | Beautiful in the right house, but it can look forced in a minimalist interior. |
Two terms come up often in trim work. A cove profile is simply a concave shape, which makes it feel softer and less ornate. Dentil molding uses repeated small block-like details, which reads much more traditional. That difference matters more than people realize, because the profile sets the room’s tone before the paint color even does.
From here, it helps to think about the room itself, because placement changes the effect more than most people expect.
Where crown molding works best room by room
Not every room needs the same treatment. I get the best results when the molding supports the room’s function instead of fighting it.
| Room | Best approach | Why it works | What to avoid |
|---|---|---|---|
| Living room | Medium-width profile, often color-matched or painted softly contrasting | Frames the room and makes the main gathering space feel intentional | Overly ornate trim if the furniture, rugs, and art are already doing a lot |
| Dining room | Slightly wider or layered molding | Adds formality and helps the room feel like a destination | Undersized trim on tall walls, which can look accidental |
| Kitchen | Simple profile, especially near upper cabinets or in an eat-in zone | Ties the ceiling line to the cabinetry and softens hard edges | Moisture-sensitive material in steamy areas |
| Bedroom | Soft cove or restrained stepped profile | Creates a calm, finished look without adding visual noise | Heavy ornament that competes with bedding and window treatments |
| Hallway or entry | Modest profile repeated consistently | Helps transitions feel cohesive from one room to the next | Changing the trim style every few feet |
| Home office | Clean trim, often color-drenched for a tailored look | Adds character without distracting from work | Fussy detailing that makes the room feel formal in a bad way |
| Bathroom or laundry room | Moisture-resistant material such as PVC | Handles humidity better and still gives a finished edge | MDF in damp spaces where it can swell or warp |
I also like using crown molding to connect open-plan spaces. If a kitchen, dining area, and living zone share sightlines, repeating the same profile keeps the house from feeling chopped up. The room still stays open, but the ceiling line helps define where one zone ends and the next begins.
Once you know where the trim belongs, the next decision is proportion, not decoration.
How to choose the right profile, width, and material
Scale is where a lot of DIY trim projects go wrong. Too small, and the molding disappears. Too large, and it can make the ceiling feel lower or the room feel top-heavy.
| Ceiling height | Good starting width | What I’d watch for |
|---|---|---|
| 8 feet | 2 to 4 inches | Keep the profile modest so the room does not feel compressed. |
| 9 feet | 3 to 3.5 inches | This is a comfortable middle ground for many homes. |
| 10 feet or higher | 5 to 7 inches or a layered build-up | Wider trim can hold the visual scale of the room without looking thin. |
For material, I narrow it down this way:
| Material | Best for | Strengths | Limitations |
|---|---|---|---|
| MDF | Paint-grade rooms, budget renovations, simple profiles | Smooth surface, easy to cut, easy to paint, usually the cheapest option | Not ideal in moisture-prone areas |
| Solid wood | Stain-grade work, premium trim, classic homes | Rich look, durable, repairable | Costs more and can move with humidity |
| PVC | Bathrooms, laundry rooms, and damp zones | Moisture-resistant and low maintenance | Less natural-looking if you want a wood finish |
| Plaster | Historic homes and custom architectural work | Seamless, highly detailed, very refined | Specialist labor and a higher price point |
For budgeting, I treat installed crown molding in the U.S. as a broad range rather than a single number. Simple projects can stay relatively affordable, but once the room has tall ceilings, lots of corners, or a more intricate profile, labor quickly becomes a major part of the total. If you want the trim to look custom, the material matters, but the room’s geometry matters just as much.
That leads directly to the part most people overlook: finish.
Paint and finish choices that change the whole mood
The profile gets attention, but the finish decides whether the trim blends in, frames the room, or becomes the focal point. I usually think about molding as part of the room’s color strategy, not as an isolated detail.
- Match the ceiling color when you want the room to feel taller and calmer. This works especially well in light, airy spaces.
- Match the wall color when you want a quieter, more continuous look. It is a strong choice for modern or color-drenched rooms.
- Match the existing trim when the goal is continuity. This is the safest option in houses with older baseboards and casing.
- Use a slightly higher sheen on the molding than on the walls if you want a subtle architectural edge. The small change in reflectivity helps the detail read cleanly.
- Try a bold trim color only when the room is otherwise restrained. A deep green, charcoal, or navy can look excellent, but it needs room to breathe.
Wallpaper changes the equation. If the walls already have a strong pattern, I prefer a simpler crown so the top of the room does not get visually crowded. The same is true when there is already a lot of millwork: picture frame molding, wainscoting, and built-ins can all live together, but only if the profiles are coordinated. Picture frame molding, for example, is the decorative trim used to create wall panels or framed sections; it works best when it echoes the crown instead of competing with it.
My rule is simple: if the room already has strong texture, let the crown stay quiet. If the room is plain, let the crown carry more of the visual interest. That balance keeps the space from feeling overdone, and it also makes the install itself easier to judge.
DIY planning and the mistakes that make trim look amateur
Crown molding is a very doable DIY project in the right room, but it is unforgiving of sloppy measuring. I would rather see a homeowner choose a simpler profile and install it cleanly than pick an elaborate shape and fight it for a weekend.
- Measure the full perimeter of the room and add extra for waste and corner cuts. I usually plan for at least 10% more material than the straight footage suggests.
- Check the walls and ceiling for out-of-square corners. If the room is older, assume the corners are not perfect until you prove otherwise.
- Dry-fit the first few pieces before you nail anything. One accurate corner tells you more than five guesses.
- Use a compound miter saw for clean cuts, and a coping saw if you want tighter inside corners on traditional profiles. Coping means shaping one piece to follow the profile of the other, which often gives a cleaner joint than forcing two miters to meet perfectly.
- Prime or prefinish MDF before installation if you can. It saves time and keeps the finish more even.
- Caulk lightly, not heavily. Caulk hides tiny gaps, but it will not rescue bad alignment.
The mistakes I see most often are predictable. People choose molding that is too large for the ceiling height, install it at an uneven line, or mix too many trim profiles in one small space. Another common problem is trying to make every room look grand. That works in a formal dining room; it usually backfires in a narrow hallway or a low-ceiling bedroom.
If you hire the work out, complexity drives the price more than most homeowners expect. Tall ceilings, lots of corners, and custom build-ups all add labor. If you do it yourself, the biggest cost is usually time, patience, and the willingness to recut a piece instead of forcing it into place. Getting that sequence right makes the whole project feel less stressful.
The trims I’d pick first in a real renovation
If I were narrowing the choice quickly, I would start with the room’s scale and the home’s overall style. For a modern renovation, I would choose a narrow cove or stepped profile and paint it to blend with the walls or ceiling. For a classic home, I would go a little wider and let the trim feel more architectural. For a bathroom or laundry room, I would prioritize durability before decoration.
The safest approach is usually the one that respects the room instead of overpowering it. That does not mean boring. It means the molding does its job so well that the rest of the room looks more expensive, more finished, and more intentional. If you begin with one room and repeat the same language only where it makes sense, the whole house will feel more coherent without looking copied and pasted.
That is the real payoff of good crown molding: not just ornament, but control over proportion, color, and the way a room reads the moment you walk in.