
When you replace stair railing, the work is less about swapping a trim piece and more about matching the stair geometry, support, and code. I focus on three things first: whether the existing posts are structurally sound, which materials fit the home, and how the new layout will feel in daily use. That is the difference between a staircase that just looks updated and one that still feels solid five years later.
What matters most before you start
- Safety comes before style: a handrail and guard serve different jobs, and both need the right height and anchoring.
- The easiest upgrades are often partial: sometimes you only need a new rail and balusters, not a full post rebuild.
- Material choice affects everything: cost, maintenance, visual weight, and how difficult the install will be.
- Code checks save rework: in U.S. homes, handrail height, graspability, and post support matter more than most DIYers expect.
- Most mistakes happen at the ends: loose newel posts, bad anchors, and sloppy transitions are what make railings fail or look unfinished.
What changes when a stair railing is replaced
I treat a railing replacement as a small structural project with a decorative payoff. The visible part is the handrail, balusters, and finish, but the hidden work is what keeps the system rigid. If the current setup is a simple wall rail, the job is usually straightforward. If it has newel posts, a landing turn, or a guard at an open side, the replacement gets more technical fast.
It also helps to separate the terms. A handrail is the part you grip. A guard blocks a fall at an open edge, like a landing or balcony. A newel post is the main anchor post at the bottom, top, or turn of the stair. When those parts are combined well, the staircase feels intentional instead of patched together. That distinction matters because the next step is making sure the new layout meets current safety rules.
Check code and structure before ordering parts
For most U.S. homes, I start with the International Residential Code as a baseline, then check local amendments. The practical rules are simple enough: stairways with four or more risers need a handrail on at least one side, handrail height is typically 34 to 38 inches above the stair nosing, and open-sided edges usually need a 36-inch guard. The rail should also be easy to grasp, which is why a random 2x4 is usually a poor substitute even if it looks sturdy.
Before I buy anything, I check four things:
- Whether the existing newel posts are firmly anchored into framing, masonry, or another structural base.
- Whether the stair has a continuous slope that needs a rake rail, meaning a sloped handrail that follows the pitch of the steps.
- Whether the wall beside the stair has enough blocking or studs for a wall-mounted rail.
- Whether the new design will stay comfortable to grip without crowding the walking path.
That last point is easy to overlook. The handrail should not jut so far into the stair run that it gets in the way, and the shape should feel natural in the hand. Once those basics are clear, the next decision is which material will actually suit the house.
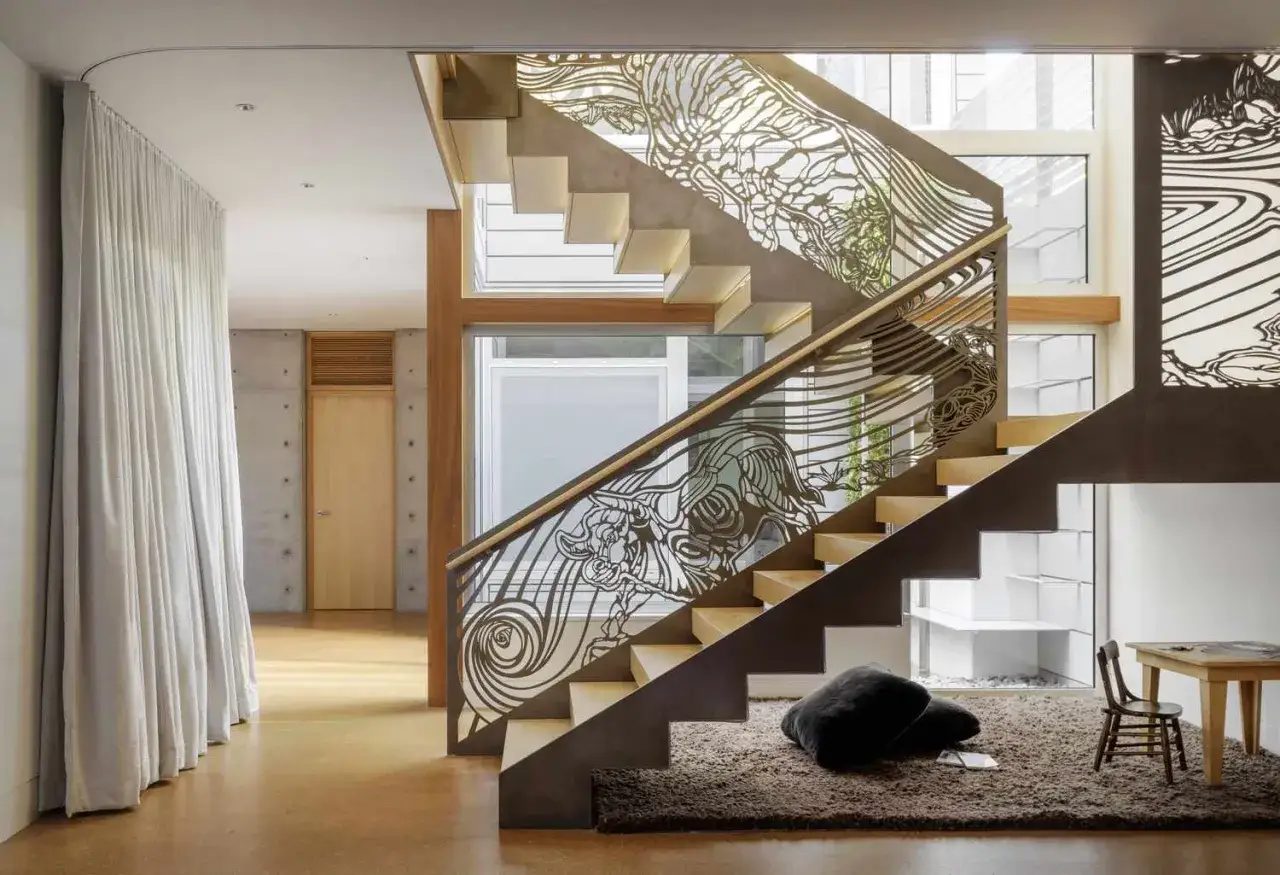
Choose a style that fits the stair and the room
From a design standpoint, this is where I spend the most time. A stair railing is one of the few elements that can change a room’s tone without changing the layout. A heavy wood rail reads traditional and warm. A slim metal system feels cleaner. Cable and glass create more openness, but they also demand tighter installation and usually less forgiveness if the framing is uneven.
| Material | Typical installed cost per linear foot | Best for | Main tradeoff |
|---|---|---|---|
| Wood | $20 to $60 | Classic interiors, painted staircases, budget-conscious updates | Needs finishing and can wear faster in busy homes |
| Wrought iron or steel | $50 to $250 | Traditional, transitional, and more durable decorative looks | Heavier visual presence and usually more labor |
| Cable | $60 to $500 | Modern interiors and open sightlines | Tensioning and alignment matter a lot |
| Glass | $100 to $600 | High-end, open, light-filled spaces | Highest cost and most detail-sensitive installation |
Those ranges line up with current HomeGuide estimates, and they explain why I usually ask homeowners to decide on the visual weight first, not the hardware. If you want a quiet, furniture-like look, wood is still the easiest path. If the house already uses black metal accents, a slim powder-coated system will probably feel more cohesive. Once the style is set, the installation itself becomes much easier to plan.
The replacement process I would follow on a typical interior staircase
For a straightforward interior project, I keep the process tight and methodical. The goal is not to make each step look dramatic; it is to keep the geometry accurate and the joints solid. I would approach it like this:
- Measure the stair run, the rise, and the exact rail angle before removing anything.
- Photograph the existing layout so the new parts match the old transitions, especially at landings and turns.
- Remove trim and fasteners carefully so drywall, plaster, or surrounding woodwork does not get torn up.
- Test the newel posts or wall anchors first, because those are what keep the whole system stable.
- Dry-fit the rail, balusters, or infill panels before final fastening.
- Finish with paint, stain, caps, or filler after the structure passes a shake test.
Start with the measurements that actually control the fit
The two numbers that matter most are the stair angle and the height of the rail relative to the nosings. If the angle is off, the rail can look wrong even if it is technically secure. I also check the spacing around any landing or turn before cutting a single part. A small mismatch here can force custom work later, which is exactly how a simple update becomes expensive.
Remove the old pieces without creating new repairs
This is where patience pays off. I loosen the visible trim first, then work back toward the hidden fasteners. If the old railing was face-screwed into a wall or post, I back out the screws and fill the holes later. If the posts were built into the stair trim, I expect patching and repainting. That is normal. What I do not want is a new railing sitting on damaged substrate, because cosmetic shortcuts almost always show up as wobble later.
Read Also: Paint Your Stairs Right: Prep, Products & Lasting Design
Install the new system and test it like a safety feature
Once the new rail is in place, I apply real pressure to it. A railing should feel firm, not springy. I also check the top and bottom transitions, because that is where the hand naturally notices awkwardness. If the rail is continuous and the posts are tight, the staircase immediately feels more finished. If it is even slightly misaligned, the whole room starts to look off.
What the project usually costs and when I would hire a pro
Budget is where homeowners can get misled. A simple wood replacement may stay manageable, but once you add custom balusters, new posts, or glass infill, the total can rise quickly. For many projects, HomeGuide currently places wood railings around $20 to $60 per linear foot installed and metal systems around $50 to $250 per linear foot, with a typical 25-foot project landing around $500 to $6,300. Cable and glass are usually the most expensive options.
| Project type | Typical effort | Why people choose it | When I would hire a pro |
|---|---|---|---|
| Wall-mounted rail only | Half day to 1 day | Lowest cost and simplest structure | When the wall is plaster, masonry, or unknown framing |
| Rail plus balusters | 1 to 2 days | Best value for a visible upgrade | When spacing, trimming, or finish matching is tricky |
| Post-and-rail system | 1 to 3 days | Most complete transformation | When posts need structural anchoring or custom joinery |
| Cable or glass system | Often more than a weekend | Clean, modern look | When tensioning, templating, or precise leveling matters |
I would bring in a pro if the stair is curved, the old posts are loose, the railing attaches to concrete or tile, or the new design changes the load path. Those are the places where DIY confidence tends to outrun reality. If the job is mostly carpentry, you can usually manage it with patience and the right layout. If it becomes a structural or code-sensitive project, the labor cost is often cheaper than fixing a bad install.
The mistakes that make a new railing feel cheap or unsafe
- Using the wrong reference line: measuring from the floor instead of the stair nosing can throw off the handrail height.
- Trusting trim screws as structure: finish fasteners are not the same as anchors into framing.
- Ignoring the ends: the top and bottom transitions are where the eye and hand notice problems first.
- Choosing a beautiful but awkward profile: some rails look good in photos and feel terrible in daily use.
- Skipping patch and finish work: old holes, mismatched stain, and exposed caulk make the job look unfinished.
- Underestimating cable or glass: those systems reward precision and punish guesswork.
My rule is simple: if the railing can flex, squeak, or feel vague under a firm pull, it is not finished yet. The last thing I want after an upgrade is a staircase that looks modern but does not inspire confidence. A good railing should disappear into the architecture in the best possible way.
The finishing details that make the upgrade look deliberate
The final 10 percent of this project carries more visual weight than most people expect. I always check whether the stain or paint ties into the stair trim, whether the balusters align visually with adjacent vertical lines in the room, and whether the new hardware feels consistent with nearby door handles or lighting. Those details are not decorative fluff; they are what make the railing feel like it belongs there.
If I were doing this in my own house, I would choose the simplest system that fits the architecture, make the structure solid, and spend a little extra time on the finish. That approach is usually the fastest route to a staircase that looks cleaner, feels safer, and ages better. In a home, that is the standard worth aiming for.