
Brass looks best when the finish matches the piece: bright on a lamp, softer on antique hardware, and never scratched into a dull haze. Knowing how to polish brass is mostly about choosing the mildest method that still removes tarnish. This guide walks through the finish check, the cleaning steps, the best DIY paste options, and the mistakes that make brass look worse instead of better.
Key takeaways for getting brass bright again
- Start by checking whether the piece is solid brass, brass-plated, or lacquered, because the wrong method can damage the finish.
- For bare brass, warm soapy water comes first; polish only after grime is gone.
- Light tarnish often responds to lemon and baking soda or another mild paste in 10 to 15 minutes.
- Lacquered brass usually needs cleaning, not polishing; harsh polish can cloud or strip the coating.
- Protect the result with a dry buff and a thin wax coat if you want the shine to last longer.
Start by figuring out what kind of brass you have
I always start here, because the finish decides the method. Solid brass can usually tolerate more polishing, while brass-plated pieces and lacquered surfaces need a lighter touch. A quick magnet test helps in a rough way: if a magnet sticks firmly, the piece is probably not solid brass. If it does not stick, that still does not guarantee you are looking at bare brass, only that the base metal is not obviously magnetic.
Lacquered brass is the other big fork in the road. It often looks shiny even when it is dirty, because the clear coat is doing the work, not the metal beneath it. If the surface has a slightly plastic feel, shows patchy dulling, or tarnishes unevenly around chips and worn edges, assume the coating is still there. In that case, the goal is cleaning, not aggressive polishing. That distinction is what keeps a nice hardware refresh from turning into a refinishing project.
Once you know the finish, the rest of the work gets much easier and much safer.
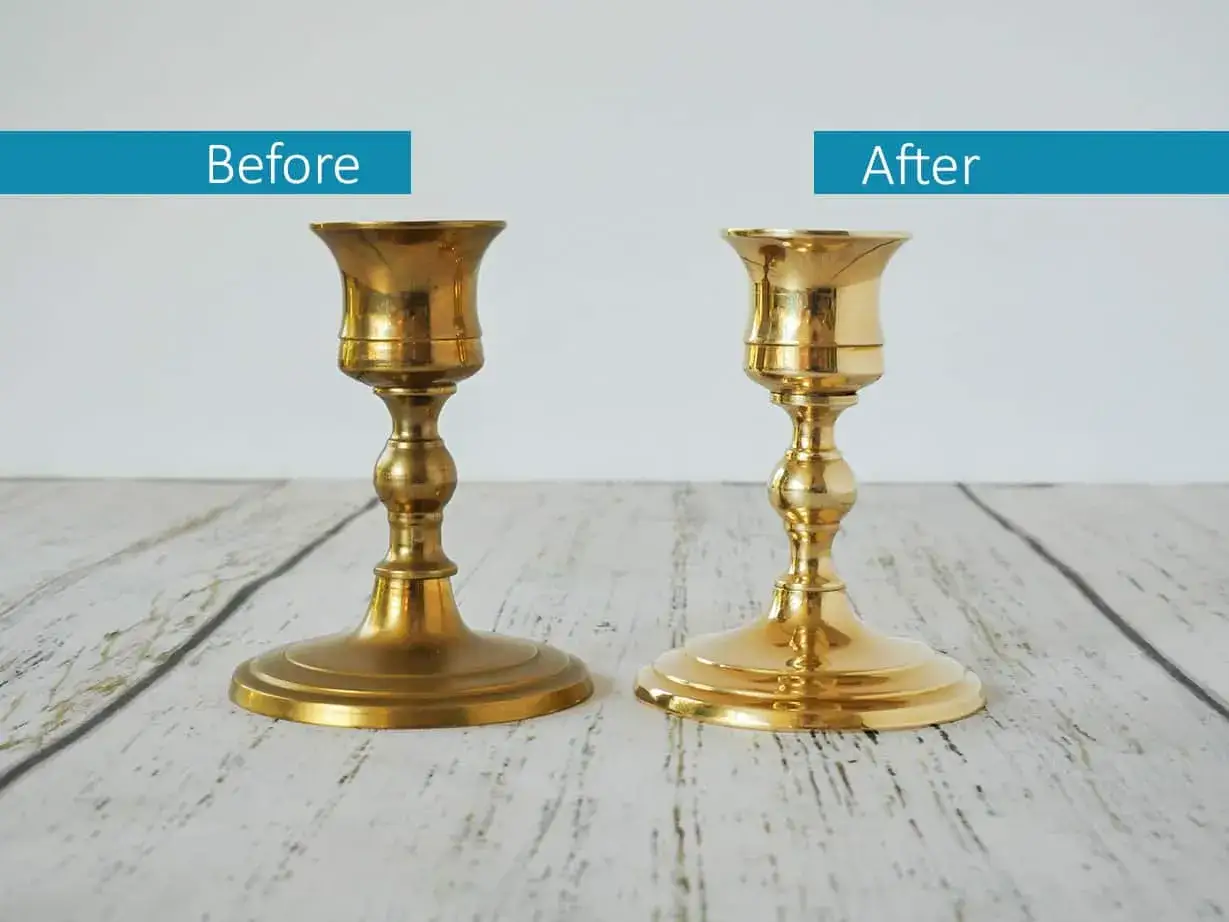
The safest way to clean and polish bare brass
For raw brass, I like to work in layers. Remove surface dirt first, then deal with tarnish, then protect the finish. It sounds basic, but this sequence matters more than the product you choose.
Here is the workflow I trust most for furniture hardware, lamps, trays, and decorative pieces:
- Dust the piece with a dry microfiber cloth.
- Wash it with warm water and a small amount of mild dish soap.
- Rinse with clean water and dry completely.
- Apply a mild polishing paste to a soft cloth or cotton pad.
- Rub in small, even motions until the tarnish lifts.
- Wipe away residue, rinse again if needed, and dry thoroughly.
- Buff with a fresh cloth until the surface feels smooth and looks even.
My rule is simple: if warm soapy water gets you most of the way there, stop there. Brass usually looks better when it still has some depth instead of a machine-perfect glare. For brushed or satin brass, follow the grain if you can see one. For polished brass, use gentle circular or back-and-forth strokes, but keep the pressure light. You want to lift tarnish, not grind it into the metal.
Choose the right method for the level of tarnish
Different kinds of dullness need different levels of intervention. Light fingerprints do not call for the same treatment as green oxidation or years of built-up haze. When I decide what to use, I think in terms of risk first and shine second.
| Method | Best for | Typical time | Main caution |
|---|---|---|---|
| Warm water and dish soap | Dust, fingerprints, light grime, lacquered brass | 5 minutes | Will not remove heavy tarnish |
| Lemon juice and baking soda paste | Light to moderate tarnish on bare brass | 5 to 10 minutes before buffing | Rinse well so acidic residue does not linger |
| Vinegar, salt, and flour paste | Heavier tarnish or stubborn dull spots on raw brass | 10 to 15 minutes | Can lighten patina quickly, so test first |
| Commercial brass polish | Stubborn tarnish on solid brass and decorative pieces | Usually a few minutes, depending on the label | Can be too aggressive for antiques or plated items |
| Microcrystalline wax | Protecting a clean, polished surface | About 10 minutes to apply and buff | It is a protector, not a cleaner |
For a quick DIY mix, one teaspoon of baking soda and one teaspoon of lemon juice makes a simple paste for a small item. For the vinegar method, equal parts white vinegar, salt, and plain flour create a slightly thicker paste that clings better to corners and ornamented details. I would still start small and test on the back or underside of the piece first. If the cloth comes away with color and the finish looks uneven, stop and rethink the method.
The main advantage of these gentle recipes is control. You can repeat them in stages instead of trying to blast the tarnish off in one aggressive pass.
Lacquered brass needs a different approach
Lacquered brass is where many DIY jobs go wrong. The coating is there to slow tarnish, so a polish meant for bare metal can strip, cloud, or scratch it. If the finish is intact, treat the piece like a coated decorative surface rather than an exposed metal object.
My usual approach is warm water, a drop of mild dish soap, a soft cloth, and a dry buff at the end. That is enough for most lamps, cabinet pulls, and accessories that only need surface cleaning. If the lacquer is yellowing, peeling, or wearing off at the edges, polishing the exposed areas will not solve the real problem. At that point, you are looking at a refinish decision: leave the piece alone, strip the old coating, or have it professionally restored.
That last option is worth considering for antique hardware, higher-end furniture details, or any brass piece whose finish is part of the design story. Once lacquer is compromised, the surface can age unevenly very quickly.
Keep the shine longer after the polishing is done
The fastest way to keep brass looking good is not more polishing. It is better protection and less handling. Brass reacts to moisture, skin oils, steam, and air, so even a well-polished piece will dull again if the environment is rough enough.
- Wipe fingerprints away with a soft dry cloth instead of letting them sit.
- Dry brass immediately after washing, especially around seams, grooves, and screw heads.
- Apply a thin wax layer to bare brass if you want to slow tarnish and make future cleaning easier.
- Handle decorative pieces with clean hands, or even cotton gloves for heirlooms and display items.
- For hardware that gets touched daily, plan on light maintenance every 1 to 3 months.
- For decorative objects that are mostly untouched, a gentle check every 3 to 6 months is usually enough.
Wax is underrated in home care. A thin coat will not make brass maintenance disappear, but it does buy you time, especially on lamps, trays, and drawer pulls that collect fingerprints. For me, that small step often makes the difference between a finish that stays elegant and one that turns dull in a week.
The mistakes that make brass look worse
Most bad brass results come from overcorrection. People see tarnish and reach for something stronger, but stronger is exactly how you end up with scratches, uneven shine, or a finish that looks freshly damaged instead of refreshed.
- Using steel wool, scouring pads, or gritty sponges on visible surfaces.
- Leaving acidic paste on too long and dulling the surface.
- Skipping the rinse so residue dries into a cloudy film.
- Polishing plated brass as if it were solid brass.
- Ignoring the grain on brushed brass and creating random scratch marks.
- Over-polishing antique pieces until the natural patina disappears.
- Forgetting to dry corners, crevices, and hardware around screws and joints.
The mistake I see most often is impatience. Brass rarely needs force; it usually needs repeatable, light passes. If a piece is heavily tarnished, do several careful rounds instead of one harsh one. That takes a little longer, but it keeps the finish more even and much easier to live with.
When a brass piece deserves a professional touch
Not every item should be treated as a weekend DIY project. If the brass is antique, plated over a fragile base metal, wired into a lamp or fixture, or already showing deep corrosion, I would slow down and assess the value before touching it with polish. A valuable heirloom with original lacquer is especially easy to damage because once you cut through the finish, you cannot simply put the old surface back.
Professional help makes the most sense when you are dealing with any of these:
- Antique or collectible brass with historical value.
- Brass-plated furniture hardware where the coating may be thin.
- Electrical fixtures that need disassembly to clean safely.
- Pieces with peeling lacquer, deep pits, or pinkish areas that suggest metal loss.
- Decorative objects where the original patina is part of the design intent.
In those cases, restraint is cheaper than repair. A careful cleaning can preserve value, while a rushed polish can erase it.
What matters most once you want the finish to last
The smartest brass care routine is the one you can repeat without hesitation. Clean gently, choose the mildest effective method, and protect the surface only after the metal is truly clean. That approach works better than chasing a perfect shine with stronger and stronger products.
Once you know how to polish brass without guessing at the finish, the rest is maintenance: a soft cloth, a little patience, and enough restraint to stop before the metal starts looking overworked. That is usually what keeps hardware, lamps, trays, and decorative pieces looking intentional in a room instead of tired.